The 2-5 Packers have lost four straight as quarterback Jordan Love has regressed after a promising start to the year.
The Pack will look to put an end to their losing streak at home against the 3-5 Rams, who have dropped their last two games and may need to start Brett Rypien in place of Matthew Stafford, who left last week’s game with a sprained thumb.
The Rams and Packers kick off in Green Bay at 1 p.m. ET (10 a.m. PT) on Fox. Here is how you can watch, even if the game isn’t available on your local Fox channel.
The game will be shown on TV in the Green Bay and Los Angeles areas (according to 506 Sports) on live TV streaming services, but there may be cases where you’re blocked because of an internet location glitch or just want an added layer of privacy for streaming. There is an option that doesn’t require subscribing to something like NFL Sunday Ticket or NFL Plus, or searching the internet for a sketchy website: You can use a virtual private network, or VPN.
Here’s how you can watch the game from anywhere in the US with a VPN.
Read more: NFL 2023: How to Watch and Stream Games and RedZone With or Without Cable
Rams vs. Packers: When and where?
Week 9 of the NFL season sees the Packers host the Rams at 1 p.m. ET (10 a.m. PT)on Sunday. The game will take place at Lambeau Field in Green Bay, Wisconsin, home of the Packers.
How to watch the Rams vs. Packers game online from anywhere using a VPN
If you find yourself unable to view the game locally due to incorrectly applied blackout restrictions, you may need a different way to watch the game and that’s where using a VPN can come in handy. A VPN is also the best way to stop your ISP from throttling your speeds on game day by encrypting your traffic, plus it’s a great idea for when you’re traveling and find yourself connected to a Wi-Fi network, and you want to add an extra layer of privacy for your devices and logins.
With a VPN, you’re able to virtually change your location on your phone, tablet or laptop to get access to the game. So if your internet provider or mobile carrier has stuck you with an IP address that incorrectly shows your location in a blackout zone, a VPN can correct that problem by giving you an IP address in your correct, nonblackout area. Most VPNs, like our Editors’ Choice, ExpressVPN, make it really easy to do this.
Using a VPN to watch or stream sports is legal in any country where VPNs are legal, including the US and Canada, as long as you’ve got a legitimate subscription to the service you’re streaming. You should be sure your VPN is set up correctly to prevent leaks: Even where VPNs are legal, the streaming service may terminate the account of anyone it deems to be circumventing correctly applied blackout restrictions.
Looking for other options? Be sure to check out some of the other great VPN deals taking place right now.
Livestream the Rams vs. Packers game in the US
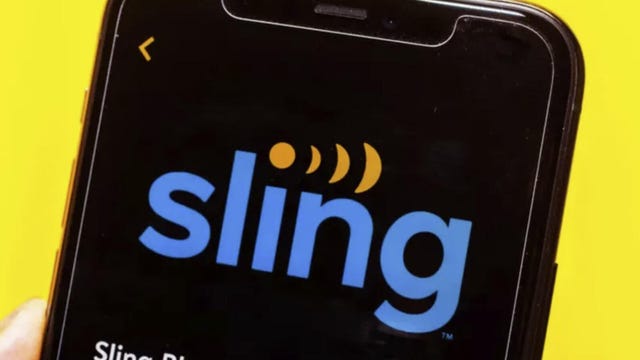
This week’s Rams-Packers game is on Fox, so in addition to a VPN set to an area carrying the game (see tips below) you’ll need a live TV streaming service that carries a local Fox affiliate that’s broadcasting the game. The least expensive such service is Sling TV Blue.
Numerous other live TV streaming services carry local Fox stations as well, namely YouTube TV, Hulu Plus Live TV, DirecTV Stream and Fubo. They all cost more than Sling TV, but they also carry more channels, including football-broadcasting channels like ESPN. Check out our live TV streaming services guide for details.
If you live in an area where the game is being broadcast, an over-the-air antenna connected to your TV provides another option for Fox. The best part about antennas is that there are no streaming or monthly fees required, though you will need to make sure you have good reception.
Quick tips for streaming Rams vs. Packers using a VPN
With four variables at play — your ISP, browser, video streaming provider and VPN — experience and success may vary.
Sling Blue is only an option if and when the ability to get Fox local affiliates is active on your account. You may want to verify that your billing address is eligible for that option before committing your credit card.
If you don’t see your desired location as a default option for ExpressVPN, try using the “search for city or country” option.
If you’re having trouble getting the game after you’ve turned on your VPN and set it to the correct viewing area, there are two things you can try for a quick fix. First, log into your streaming service subscription account and make sure the address registered for the account is an address in the correct viewing area. If not, you may need to change the physical address on file with your account. Second, some smart TVs — like Roku — don’t have VPN apps you can install directly on the device itself. Instead, you’ll have to install the VPN on your router or the mobile hotspot you’re using (like your phone) so that any device on its Wi-Fi network now appears in the correct viewing location.
All of the VPN providers we recommend have helpful instructions on their main site for quickly installing the VPN on your router. In some cases with smart TV services, after you install a cable network’s sports app, you’ll be asked to verify a numeric code or click a link sent to your email address on file for your smart TV. This is where having a VPN on your router will also help, since both devices will appear to be in the correct location.
And remember, browsers can often give away a location despite using a VPN, so be sure you’re using a privacy-first browser to log into your services. We normally recommend Brave.
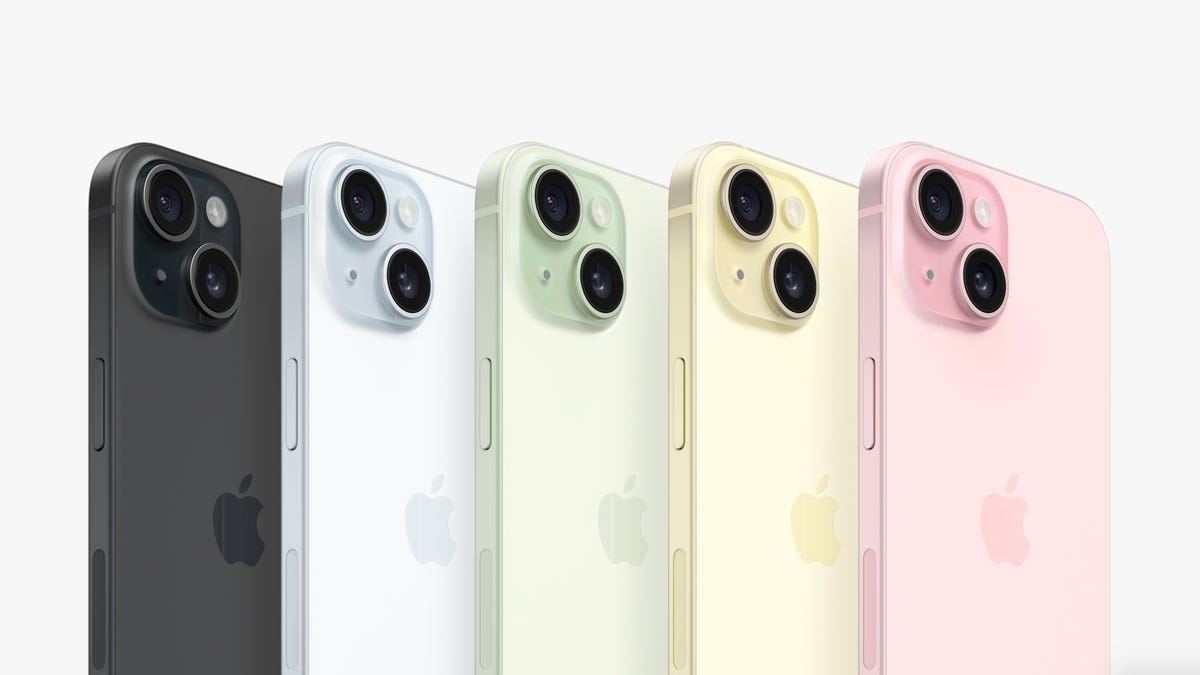
iOS 17 came out earlier this fall, and it brought all sorts of new features to compatible iPhones. This includes the ability to create your own contact poster, the brand-new StandBy mode, the Journal app and more. Among these new features is the smaller, but very powerful, ability to have your phone automatically delete all of the two-factor authentication codes that are sent to your iMessage or Mail inboxes.
Two-factor authentication is a simple, yet effective way to protect your information. By having a service send a code to your device when logging in to your account, you can make it harder for your information to get stolen. However, it gets a little messy when your messages app is constantly clogged up with all the codes that get sent directly to your messages or email inboxes.
With this new feature, all you’ll need to do is toggle one setting, and then the two-factor authentication codes will be automatically deleted from your account, freeing up your inboxes.
Here’s our review of the new iPhone 15 Pro and Pro Max, and here’s a rundown of everything announced at Apple’s event in September.
Go Inside the Apple iPhone 15 and iPhone 15 Pro: See How the New iPhones Look and Work
How can I automatically delete two-factor authentication codes?
On iOS 17, if you want to turn on the option to automatically delete your two-factor authentication codes, you’ll first need to go into your Settings on your phone. After you’ve opened your settings, navigate to the Passwords tab. Then tap Passwords. (You may need to unlock your phone.) Now tap Password Options scroll down to the Verification Codes section and enable Clean Up Automatically.
After you turn that one, you should be set. And don’t worry: This won’t automatically delete any unused authentication codes — it only deletes codes that you’ve already used. This also works in the Mail app, so all of your inboxes will be squeaky clean.
For more, here are some hidden iOS 17 features you need to know and the most impressive features of iOS 17.
iOS 17 has been available to compatible phones, and the iPhone 15 series has been on shelves, for over a month. That means Apple fans have had plenty of time to assess all of the new features the tech giant’s latest upgrade brought. While some features are super helpful or fun to use, others are, well… not.
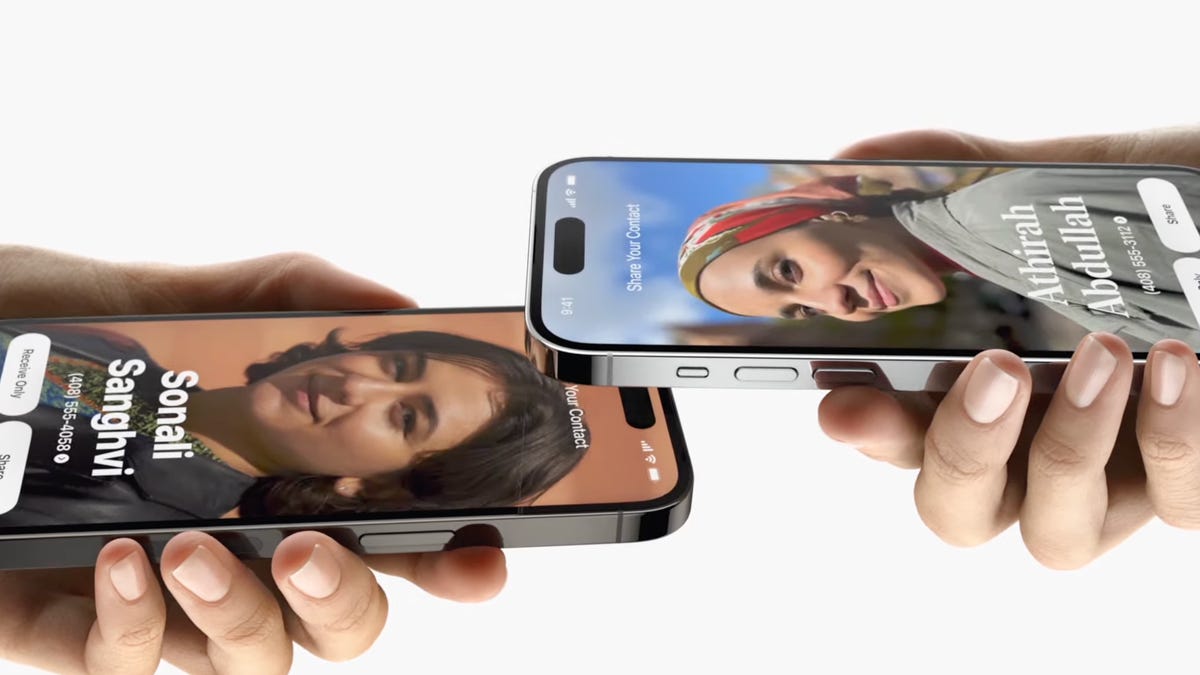
One feature that has got Apple fans split is NameDrop. While some fans are enjoying the ease of being able to simply raise their phone to share their contact info with others, some are wary of that very same ease. Specifically, there is concern about how easy contact information can accidentally be shared with someone you don’t want to share with — or even worse, how easy it could be stolen.
Users on X (formerly Twitter) have brought up concerns about how the feature could jeopardize users’ safety. For instance, several women have raised concerns about being able to dodge creeps in public spaces. For instance, @ChanSteele tweeted, “How do you NameDrop a fake number? Asking for all women.”
These concerns about safety are absolutely valid, and if you find yourself concerned and wanting to disable NameDrop, read on to find out your options for NameDrop management.
For more, here’s how to fix the most annoying iOS 17 features and everything you should do before updating to iOS 17.
So is NameDrop dangerous?
The good news is, NameDrop isn’t necessarily dangerous. According to Apple, you’re able to select which pieces of information are shared when you NameDrop your contact to another person.
You also only have two options when two iPhones are placed together and the option for NameDrop is presented. You can either Receive Only, which means that you will only receive the other person’s contact information, or you can Share. When you select Share you will send your contact information and receive the other person’s contact information.
So if you somehow accidentally NameDrop with someone you don’t want to, you’ve got options. You can be ultraselective about what information you choose to share, or opt to receive only.
However, if you still don’t feel comfortable with NameDrop, you can disable the feature. It’s important to note that NameDrop is automatically enabled when you download iOS 17 or purchase an iPhone 15, so you will have to turn it off if you don’t want it active on your phone.
How do I disable NameDrop?
If you want NameDrop disabled for good, then you’re in luck. It’s pretty simple to turn it off.
All you need to do to disable NameDrop is:
1. Open the Settings app.
2. Tap on General.
3. Navigate to the AirDrop tab.
4. Once you open the tab, simply toggle the Bring Devices Together option off. It’s as easy as that. And if you have a change of heart and decide you feel comfortable with NameDrop and want to enable it, all you need to do is toggle the Bring Devices Together option back on.
For more, here’s our review of the iPhone 15 and 15 Plus and the iPhone 15 Pro and Pro Max.
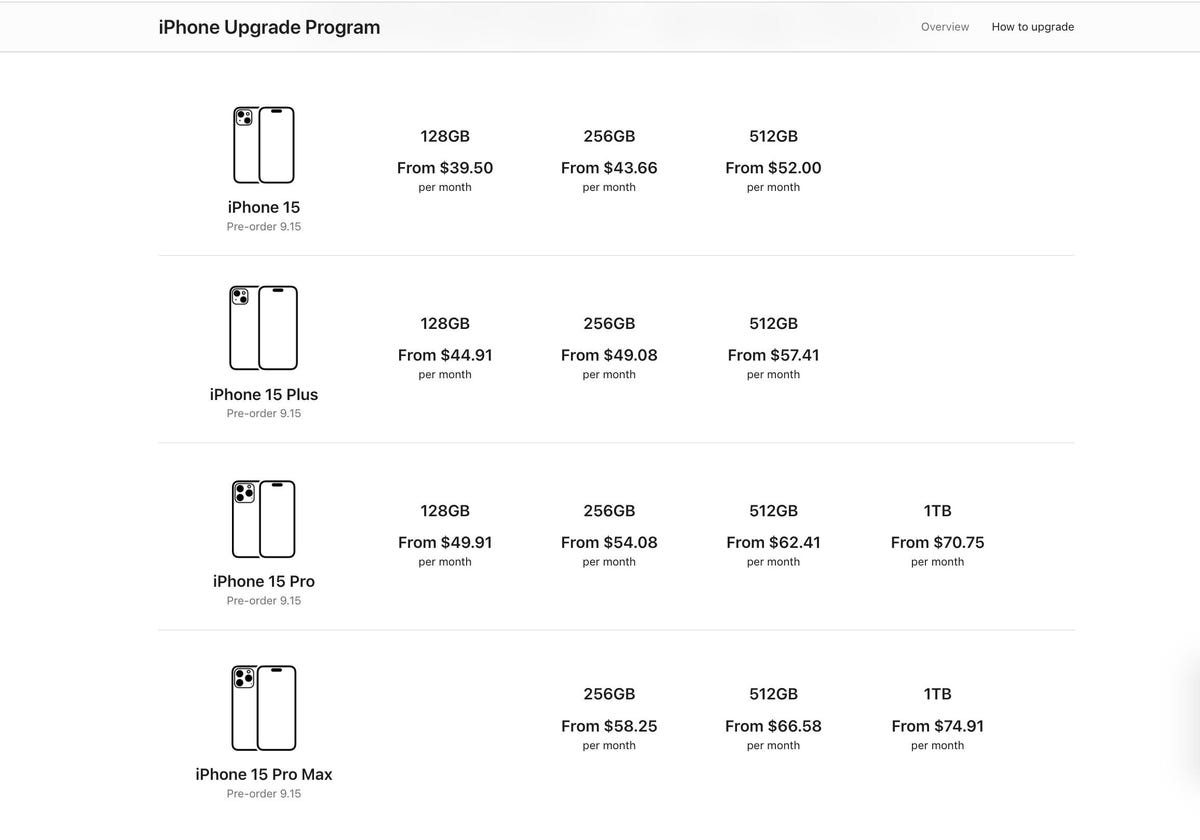
Apple’s iPhone 15 and Plus and the iPhone 15 Pro and Pro Max went on sale earlier this fall. If you’re someone who looks forward to switching out your iPhone as new models emerge each year, and you’re looking to upgrade now that the iPhone 15 has arrived, Apple’s iPhone Upgrade Program might be a fit for you.
The program is essentially an “iPhone as a service” plan. Instead of paying the full price of the phone up front or even making monthly payments to own your phone after two years, the iPhone Upgrade program lets you trade in your current phone for a new model after making 12 months of monthly payments. For that privilege, you’re basically paying a subscription fee for the foreseeable future.
Now that the iPhone 15 series is available to purchase, it might be a good time to get in on the upgrading action. To check your eligibility, all you need to do is sign in with your Apple ID on Apple’s website, and you’ll know whether your current phone is eligible for an upgrade.
How does the iPhone Upgrade Program work?
You buy an iPhone from Apple — from an Apple Store in person, Apple’s online store or the Apple Store app — and agree to pay it off over 24 months. But after making half of those payments, you’re eligible for a free upgrade. After 12 months, you can trade in your current phone for a new model. The clock starts again on the 24 months of payments and eligibility to upgrade after making 12 of them.
Read more: Get the iPhone 15 Pro and an Unlimited Plan for Just $60 Per Month
Why buy from Apple instead of a carrier?
Apple sweetens the deal by including its AppleCare Plus coverage at a slight discount with the iPhone Upgrade Program. AppleCare Plus is the company’s insurance and extended warranty program that would otherwise cost $8 a month for the iPhone 15, $9 a month for the iPhone15 Plus, or $10 a month for the iPhone 15 Pro or 15 Pro Max. With the Apple Upgrade Program, you pay $6.21 a month for AppleCare Plus on the iPhone 15.
AppleCare Plus doubles the standard one-year warranty to two years, but that’s less of a concern if you’re planning on trading in your phone after the first year. The real value of AppleCare Plus is getting accidental-damage protection. You get unlimited accidental damage claims to repair your phone. A cracked screen will run you $29, and other accidental damage will cost you $99. Phone support is also extended to two years with AppleCare Plus, up from the standard 90 days.
How much does it cost?
Pricing ranges from $39.50 a month for the 128GB iPhone 15 to $74.91 a month for the 1TB iPhone 15 Pro Max.
What about AppleCare Plus with Theft and Loss?
If you worry less about dropping or damaging your phone and more about losing it or it getting stolen, you can pay a bit extra per month to upgrade to AppleCare Plus with Theft and Loss coverage. With AppleCare Plus with Theft and Loss covers two incidents of theft and loss per year, with each replacement running you $149, which is still cheaper than buying a new iPhone. Upgrading to AppleCare Plus with Theft and Loss coverage adds $4.16 to your monthly Upgrade Program bill and lets you pay a small deductible to replace a lost or stolen phone rather than the full cost of replacement.
How do I pay?
You’ll need a credit card or debit card to sign up, at least in the US. In the US, Apple uses Citizens Bank for the installment loan, and it requires a valid, US-issued credit card to be eligible. You are not eligible to sign up with a prepaid card.
Go Inside the Apple iPhone 15 and iPhone 15 Pro: See How the New iPhones Look and Work
Yes. Sorry, kids, you need to be 18 years old to apply. (And given the prices of the new Pro models, I hope you’ll start being nicer to your parents.)
How do I trade in my current phone?
You can take it to an Apple Store and make the swap there, but you can also save the trip and buy from Apple’s online store or the Apple Store app. When you order an iPhone online from Apple, it’ll arrive with a trade-in kit so you can package up your suddenly outdated phone and ship it back to Apple. You need to get it back to Apple within 14 days.
Read more: How to Sell Your Old iPhone Before Upgrading
What if my current iPhone is banged up?
According to Apple, your current iPhone needs to be in “good physical and operational condition.” That means it should:
Be able to power on and hold a charge.
Have an intact and functioning display.
Have no breaks or cracks.
I haven’t made 12 payments yet on my current phone, can I still upgrade?
Yes, but it’ll cost you. If you’ve made at least six monthly payments on your current phone, you can pay the difference between your current balance and the total for 12 payments to fast-forward the clock and get a new iPhone.
Do I need to upgrade?
No, not all at! You aren’t forced to upgrade. If you’re happy with your current phone, you can keep using it and continuing to pay it off. After 24 months, you will have paid it off and can continue using it without the monthly payment, or you can turn around and sell it to help finance the cost of a new phone when you’re ready.
How is this different than Apple’s Trade In program?
Note that the iPhone Upgrade program isn’t the same as Apple’s Trade In program. While you are exchanging your old iPhone for a newer model in both programs, with the iPhone Trade In program you are simply trading in an old device for a discount on a newer one.
If you’re a part of the iPhone Upgrade program, you’re discouraged from participating in the Trade In program, since you don’t outright own your device in the iPhone Upgrade program. If you do use the Trade In program, you’ll be on the hook for the balance of both the phone you were trading in and the new phone.
For more, here’s everything that was announced at the “Wonderlust” event and what we love about iOS 17.
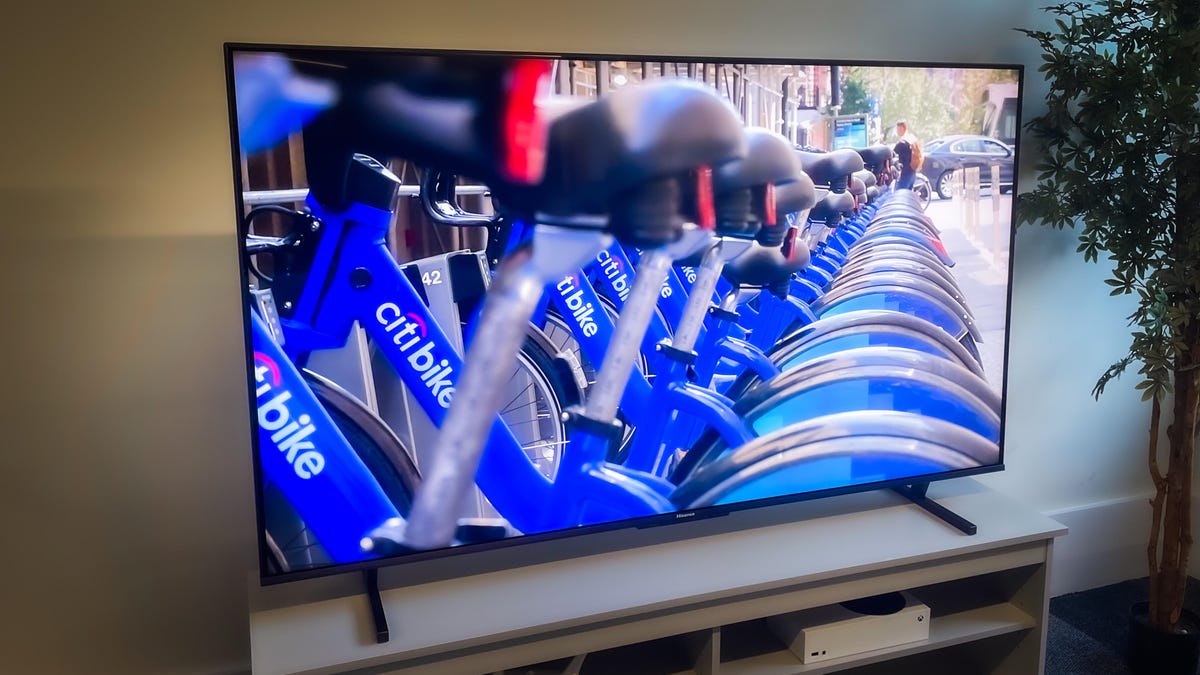
This year the competition among midpriced TVs is hotter than ever, and one of the best TVs I’ve tested is the Hisense U8K. This television offers excellent image quality for the price thanks to super-bright mini-LED technology. The brand name isn’t as well-known as Samsung or Sony, but neither of those brands has a TV with mini-LED at anywhere near the price.
The main competition for the Hisense U8K is the TCL QM8 series. Both are currently available for around the same price, both have negligible brand cachet, both use the Google TV smart system and both offer mini-LED with spectacular pictures. I compared them side by side in the TV lab at CNET and I’m confident either one would make a picture quality snob (like me) happy.
The Hisense has one medium-sized advantage: a 55-inch screen option. The smallest TCL QM8, meanwhile, is 65 inches. So if 65 is too large for your room, your budget or your tastes, the choice between the two is simple: get the 55-inch Hisense UK8. Or bite the bullet and get a bigger TV.
If you do want a 65-inch or larger TV I’d recommend the TCL by a hair, assuming their prices are close. Its picture looked brighter and more impressive overall than the Hisense, although the TCL wasn’t without flaws. That said, if that price gap grows a lot bigger, I wouldn’t blame you for saving the money and going with the U8K. It’s an excellent TV and you’d have to step way up to an OLED TV to get a significant boost in image quality.
Hisense U8K series TV sizes
I performed a hands-on evaluation of the 65-inch Hisense U8K, but this review also applies to the other screen sizes in the series. All sizes have similar specs and should provide similar picture quality. The exception is the 75-inch size, which uses a different panel type (ADS), which can lead to worse black-level performance than VA panels used on the other sizes. I can’t say for sure however since I didn’t test that size.
The U8K sits near the top of Hisense’s 2023 TVs lineup. The company does make more-expensive models – a souped-up 85-inch ULED X that costs $3,800 and ultrashort throw laser projectors (“Laser TV” according to Hisense) that start at $5,000 for 100 inches – but the U8K is the model most TV shoppers will be looking at. The company’s less-expensive U7K and U6K TV series also offer mini-LED backlights but have fewer local dimming zones and aren’t as bright as the U8K. I haven’t reviewed them but based on their specifications I expect their image quality will be worse than that of the U8K.
And if you happen to be in the market for a 100(ish)-inch TV, it’s worth noting that the 98-inch TCL QM8 costs more than $10,000 at the time of this writing while the 100-inch Hisense U8K costs less than half as much. Advantage: Hisense.
Hisense U8K design and remote: Basic, and that’s fine
The Hisense U8K is a humdrum-looking TV, and that’s OK in my book. It’s supported by a pair of squared-off legs to either side under the main panel. It’s also quite heavy, as befits a model with such a complex backlight.
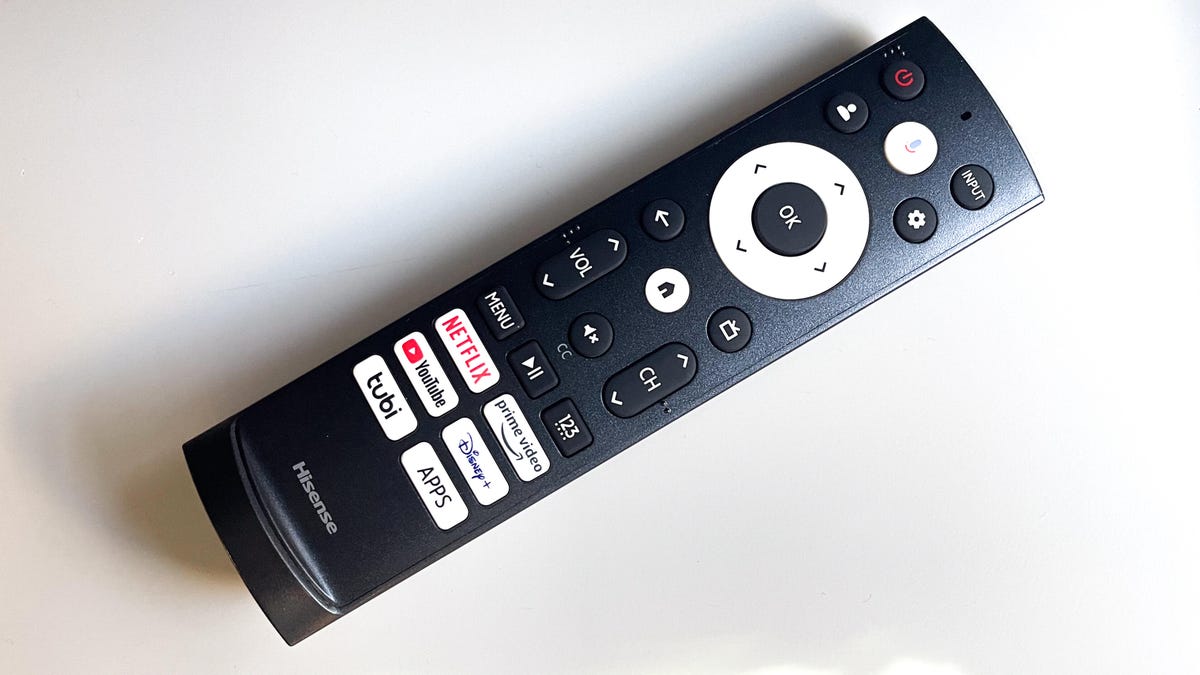
The standard black, rubber-buttoned clicker sports two different menu buttons (one gear-shaped and another “hamburger”), a dedicated profile key for some reason and no fewer than six shortcut keys to streaming services –the usual suspects and, for some reason, Tubi. Another button summons Google Assistant, which you can talk to via remote.
For what it’s worth I liked the design of the TCL QM8 better, with its central pedestal stand and superior remote.
Google TV: Fast enough and plenty of apps, more complex than Roku
Among all of the smart TV systems I like Google TV second-best, after Roku. Highlights include excellent voice results thanks to Google Assistant, a well-implemented kids profile mode and parental controls, tight integration with Google apps (in particular YouTube and YouTube TV) and more apps overall, thanks to the Play store, than proprietary systems like Samsung and LG.
The downside? In 2023 TV makers like TCL and Hisense do not offer the best image quality extras on their Roku TVs –they’re reserved strictly for Google TV models. If you want Roku on the U8K or any Google TV you’ll need to attach a Roku streaming device.
When I tested the U8K’s built-in Google TV system the responses were quick enough, and a step faster than the cheaper Hisense A6H, which we tested last year. As usual with Google I didn’t love the large chunk of space at the top devoted to promotions of shows and movies on various services. I also wish the “continue watching” row was higher-up rather than placed below the “top picks for you” and apps rows. There were lots of suggestions across various apps but still plenty of content I didn’t care about. Search results were also worse than on the Roku, with too many YouTube videos coming up. Personally I prefer the simplicity of Roku menus.
Google TV’s profiles worked well. I was easily able to set up a kids profile, and I appreciated that appropriate apps like YouTube Kids and PBS Kids were suggested for me to add, and that Netflix automatically invoked the kids profile. During setup I was also prompted to set screen time limits, create a profile picture and more. Google TV’s system provides better parental controls than Roku, although Fire TV is similarly robust.
Features: Mini-LED, gaming and every other essential
The big difference between the U8K and cheaper LCD-based TVs is its mini-LED backlight. Mini-LEDs are, as the name suggests, smaller than standard LEDs, allowing them to be grouped into more local dimming zones. Full-array local dimming is the best way to improve picture quality on LCD TVs. It allows the screen to dim and brighten different areas simultaneously. Smaller areas, or more dimming zones, mean more precise illumination –which ultimately increases contrast, the most important ingredient in a good picture –but they’re not the only factor.
The U8K has a true 120Hz refresh rate, which leads to better motion performance than 60Hz models. Like most TVs in its class today, it also uses quantum dots that help improve color compared to non-QD-equipped TVs. And of course it supports both Dolby Vision and HDR10 high dynamic range formats. These days basically the only manufacturer that doesn’t is Samsung. The U8K also has Dolby Vision IQ, which works with an ambient light sensor to automatically adjust the picture.
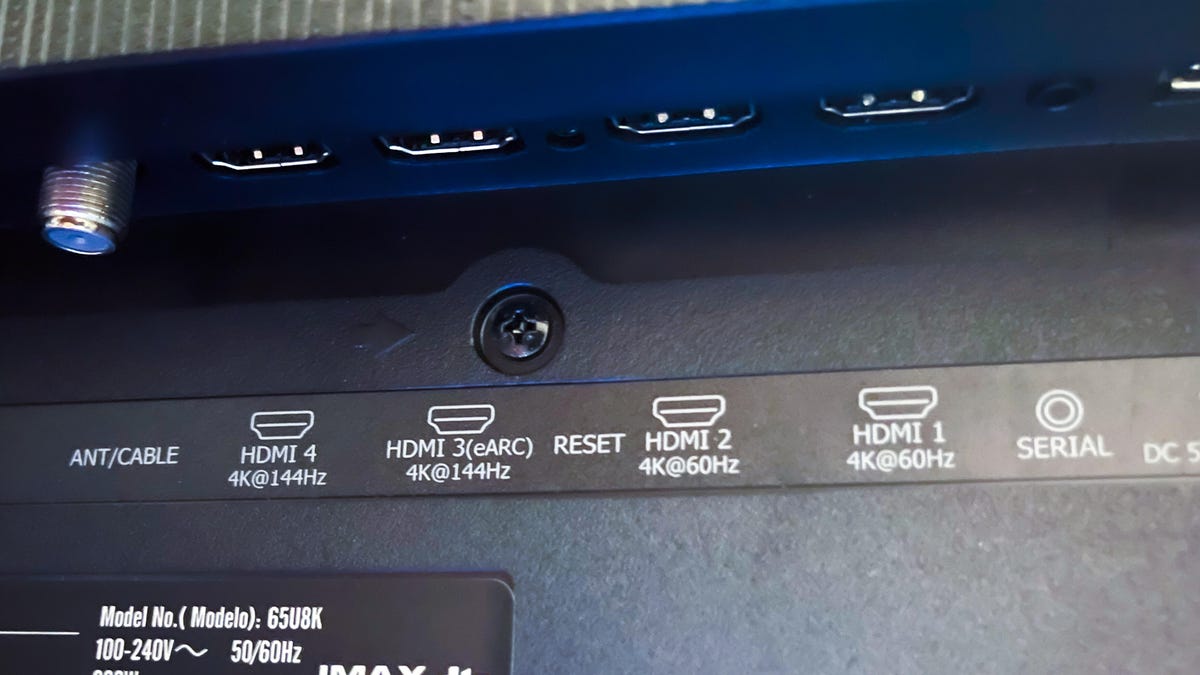
Four HDMI inputs (two with 4K/144Hz, one with eARC)
Analog (composite) AV input
Two USB ports (2.0 and 3.0)
Ethernet (wired internet)
Headphone jack
Optical digital audio output
RF (antenna) input with ATSC 3.0 NextGen TV
The U8K can accept 4K/120Hz input signals from an from an Xbox Series X or a PlayStation 5. Like many newer TVs those inputs technically go up to 144Hz, but that’s not a big deal in my opinion since since you need a PC gaming card to take advantage of it and likely won’t provide a big boost over 120Hz input. Other gaming extras are par for the midrange TV course, namely VRR, or variable refresh rate, and ALLM (auto game mode). One of the inputs also supports eARC.
The U8K’s antenna input has a built-in ATSC 3.0 over-the-air tuner, which allows it to receive NextGen TV broadcasts. Those are still only available in a small number of markets so I didn’t get the chance to check out this feature, but it’s nice to know that if the broadcasts become more widespread, U8K owners won’t have to connect an external tuner box to watch.
Hisense U8K vs. TCL QM8 and others: Picture quality compared
For this comparison I lined up three 65-inch TVs side by side: the Hisense UK8 and the TCL QM8, which cost about the same, and the LG OLED C3, which costs significantly more. I didn’t include other models in the lineup this time but from past reviews I can say the image quality of the U8K is significantly better –brighter, with better color and contrast –than the Roku TV Plus Series, Amazon’s Fire TV Omni QLED and Vizio MQX (all of which cost less) and about the same as last year’s TCL 6-Series and Hisense U8H.
TV and movies: I started my evaluations, as usual, with the demo montage from the Spears & Munsil 4K Blu-ray disc, and its nature scenes looked excellent. The well-lit shots of Yellowstone geysers and mountains were bright and brilliant, albeit a notch less impressive than the brighter TCL QM8 and not quite as contrasty as the LG OLED C3.
The difficult black background shots also looked tremendous, with almost no blooming and just a touch lighter than the absolute black I saw on the C3. The range of color and brightness looked a bit more natural on the Hisense than on the TCL, but the latter again showed an advantage in brightness.
Watching the Netflix series Our Universe, I was similarly impressed by the Hisense. In a series of animations of galaxies and star fields, for example (ep 2, 32:18), it maintained deep black levels in the letterbox bars and large swaths of void better than the TCL 6 series, albeit not quite as well as the TCL QM8 or (of course) the OLED. Highlights in a flare (33:35) were much brighter than on the OLED and 6 series, however, although again a bit dimmer than the QM8.
And when the action returned to the rainforest, the Hisense delivered excellent contrast and color in the forest canopy and plenty of detail in the fur of the chimps. Once more it lagged behind the TCL QM8 in brightness and contrast but the difference wasn’t huge. And I did think the Hisense looked a bit more natural overall than the QM8, which subjectively seemed just a bit too bright in highlights.
Gaming: Hisense offers more gaming features than on last year’s U8H, although they’re not quite as varied as on Samsung, LG or TCL. When I connected an Xbox Series X, hitting the Menu key summoned a special gaming menu along the bottom that indicates current gaming status, including real-time frames per second, HDR and other features.
Unlike the competition, Hisense doesn’t include special picture modes for gaming, although you can move to another menu to toggle away from game mode and choose others, such as “HDR Sport” or “Filmmaker.” I found this arrangement confusing, especially when the pop-up “Optimized for game settings” appeared in those other modes. I much prefer to have separate discrete modes I know are designed for gaming.
There is a single toggle for “dark detail” that brings up shadow detail, and you can tweak a special Brightness setting to adjust it. I was annoyed that a few other settings – Picture Size, Screen Position and High Refresh Rate Mode – were inactive. Don’t worry about that last one, however. According to my Xbox’s menu the U8K is capable of supporting every format the box can put out, including 4K/120Hz and Dolby Vision. I also measured a solid 14ms lag in game mode for both SDR and HDR.
Comparing the game mode image quality between the Hisense, TCL and LG C3, the story was similar to what I saw with TV and movies. The C3 looked the best overall when I played Starfield, and the TCL had the brightness advantage, but the image of the Hisense looked a bit more balanced to my eye, with more natural color, than did the TCL’s. I bumped up the local dimming setting to High on the Hisense to give it a bit more pop, but overall I preferred the more dynamic picture of the TCL for games in my side-by-side comparison.
Bright lighting: The Hisense U8K is a superb bright-room performer, especially for the money. Its brightness measured just a couple nits shy of the TCL QM8 and it costs a lot less, and of course it’s much less expensive than an equivalent Samsung. And it’s worth nothing that unlike the Samsung QN90B I tested, the other TVs including the U8K are able to maintain their “brightest mode” levels for more than a few seconds.
Light output in nits
TV
Brightest mode (HDR)
Accurate mode (HDR)
Brightest mode (SDR)
Accurate mode (SDR)
Samsung QN65Q90B
3,316
1,981
2,625
974
TCL 65QM850G
1,975
1,975
1,739
1,448
Hisense 65U8K
1,966
1,966
1,720
1,240
TCL 65R655
1,387
1,194
1,292
624
LG OLED65C3
861
817
501
464
Vizio M65QXM-K03
939
742
958
608
Roku TV Plus
514
455
579
404
In HDR the brightest mode (Imax) was also the most accurate, which is an advantage over many TVs whose brightest modes have terrible color. In SDR, however, the U8K’s brightest mode is Vivid (which, yes, has terrible color) so for bright room viewing I’d suggest using Theater Day instead. It’s still quite bright, as noted in the chart above under “accurate” but not quite as searing as Vivid. That said, it’s worth the tradeoff in brightness to get better color, in my opinion.
The TV’s screen finish did a fine job handling reflections, about as well as the TCL QM8, but it didn’t preserve dark areas as well as the C3 OLED.
Hisense U8K settings and picture mode notes
Much like the Hisense U8H I tested last year, on the U8K the three most accurate picture modes for HDR – HDR Theater, Filmmaker and IMAX modes – were essentially the same in terms of color and grayscale. I again ended up choosing Imax because the other two required tweaks to the default settings to look their best. Filmmaker engages the ambient light sensor by default, and HDR Theater does the same for the Soap Opera Effect, and in both cases I’d generally want to disable those “features.”
In SDR mode it was (just like last year) between Theater Night and Filmmaker, which both require similar tweaks. Filmmaker with the light sensor disabled was too bright, and less accurate than Theater Night, so I went with the latter for the SDR Geek Box measurements below. Again it engages motion smoothing by default, however, so I recommend turning it off (Picture > Advanced Settings > Motion Enhancement > Off). In my opinion that setting should be disabled from the start, as it is with the best picture modes of Hisense’s competitors.
Note that I also changed the gamma control (to my target 2.2 instead of the default BT.1886) so that tweak is reflected in the numbers below. I’d also recommend doing so for bright room viewing (Theater Day).
Geek box
Test
Result
Score
Black luminance (0%)
0.020
Good
Peak white luminance (SDR)
1720
Good
Avg. gamma (10-100%)
2.27
Good
Avg. grayscale error (10-100%)
1.64
Good
Dark gray error (30%)
1.24
Good
Bright gray error (80%)
2.13
Good
Avg. color checker error
1.55
Good
Avg. saturation sweeps error
1.56
Good
Avg. color error
2.33
Good
1080p/24 Cadence (IAL)
Pass
Good
Input lag (Game mode)
14.07
Good
HDR10
Black luminance (0%)
0.004
Good
Peak white luminance (10% win)
1966
Good
Gamut % UHDA/P3 (CIE 1976)
97.37
Good
ColorMatch HDR error
1.90
Good
Avg. color checker error
1.02
Good
Input lag (Game mode, 4K HDR)
14.37
Good
Check out how we test TVs for more details on the Geek box and our TV testing methodology.
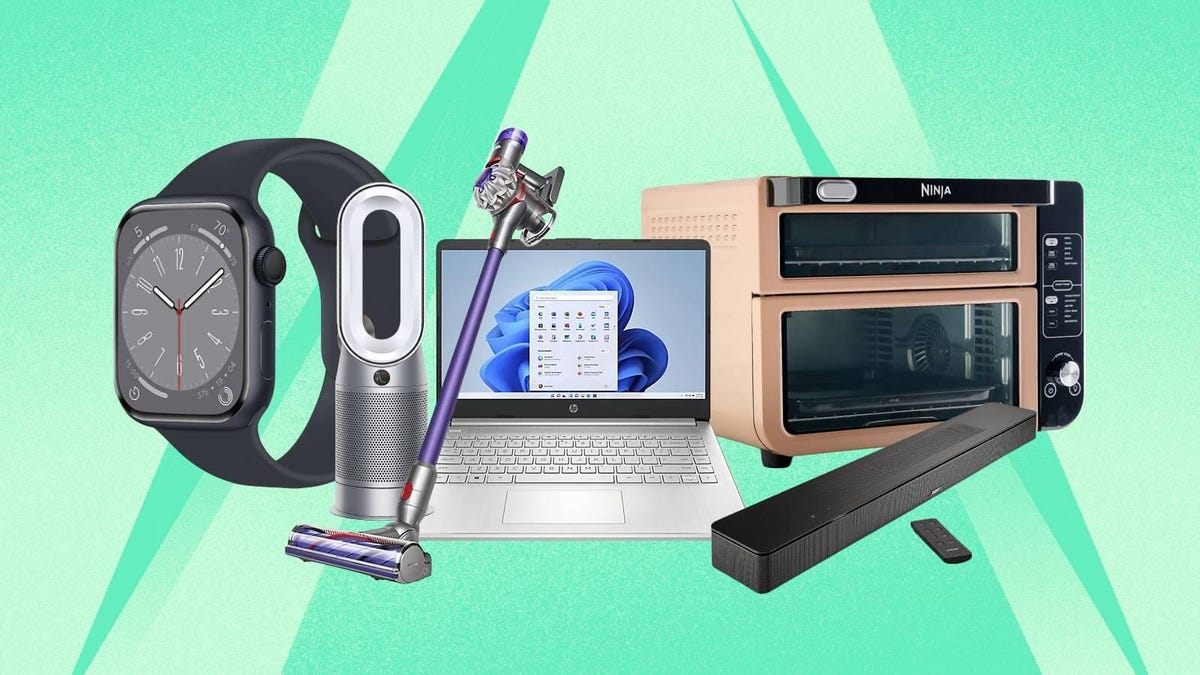
Black Friday may still be a few weeks off, but you don’t have to wait to save big. Multiple retailers have launched early sales, and this weekend QVC is discounting a ton of items, including smartwatches, laptops, air purifiers, small appliances and more during its Nonstop Holiday Party event. And the company is throwing in free shipping, too. Plus, today only (Nov. 4), if you’re a new QVC shopper, you can take an extra $30 off your purchase of $60 or more with promo code HOLIDAY30.
We’ve gone through the sale and have highlighted some of our favorite offers below. But be quick if you find a deal you love — these offers will expire Nov. 5.
QVC has even more markdowns available, with discounts on thousands of items right now, so be sure to shop the entire sale selection at QVC to find everything you need heading into the holiday shopping season.
Bored with streaming? A new show from A24 and Showtime may be able to lift the curse.
Starring Emma Stone and Nathan Fielder, The Curse is a 10-episode, genre-bending series that follows a couple trying for a baby while co-starring in a socially conscious reality show, Fliplanthropy. Unfortunately, paths of off-camera destruction accompany the on-camera renovations in the twisted series, according to a Showtime synopsis. Fielder is known for the comedy series Nathan For You and The Rehearsal.
The Curse, which premiered at the New York Film Festival in October, also stars Benny Safdie, who co-created the show with Fielder. There are two main ways to tune into the premiere: You can stream it by signing up for a subscription to Paramount Plus with Showtime, or wait a couple of days until it debuts on Showtime. Here are the release dates, plus why using a VPN might make sense for you.
How to watch The Curse
In the US, you can stream the series with a Paramount Plus with Showtime subscription. The first episode arrives on Nov. 10 at 12:01 a.m. ET/Nov. 9 at 9:01 p.m. PT.
If you want to catch it on Showtime, you’ll have to wait until it airs on Nov. 12 at 10 p.m. ET/7 p.m. PT.
Paramount Plus with Showtime — not to be confused with Paramount Plus’ $6-a-month ad-supported Essential plan — costs $12 a month and comes with perks including downloads, Showtime programming and your local live CBS station. While the Essential plan is ad-based, Paramount Plus with Showtime only displays ads on “live TV and a few shows.”
How to watch The Curse with a VPN
Perhaps you’re traveling abroad and want to stream Paramount Plus while away from home. With a VPN, you’re able to virtually change your location on your phone, tablet or laptop to get access to the series from anywhere in the world. There are other good reasons to use a VPN for streaming too.
A VPN is the best way to stop your ISP from throttling your speeds by encrypting your traffic. Using a VPN is also a great idea if you’re traveling and find yourself connected to a Wi-Fi network and want to add an extra layer of privacy for your devices and logins. Streaming TV can be a bit smoother with a reliable, quality VPN that’s passed our tests and security standards.
You can use a VPN to stream content legally as long as VPNs are allowed in your country and you have a valid subscription to the streaming service you’re using. The US and Canada are among the countries where VPNs are legal, but we advise against streaming or downloading content on illegal torrent sites. We recommend ExpressVPN, but you may opt for another provider from our best list, such as Surfshark or NordVPN.
Follow the VPN provider’s instructions for installation, and choose a country where The Curse will be streaming on Paramount Plus. Before you open the streaming app, make sure you’re connected to your VPN using your selected region. If you want to stream The Curse on more than one device, it’s possible you’ll need to configure each one to ensure you’re signed in. Go to settings and check your network connections to verify you’re logged in and connected to your VPN account. Now you’re ready to open Paramount Plus to stream.
If you run into issues with streaming, first make sure your VPN is up and running on its encrypted IP address. Double-check that you’ve followed installation instructions correctly and you’ve picked the right geographical area for viewing. If you still encounter connection problems, you may need to reboot your device. Close all apps and windows, restart your device and connect to your VPN first. Note that some streaming services have restrictions on VPN access.
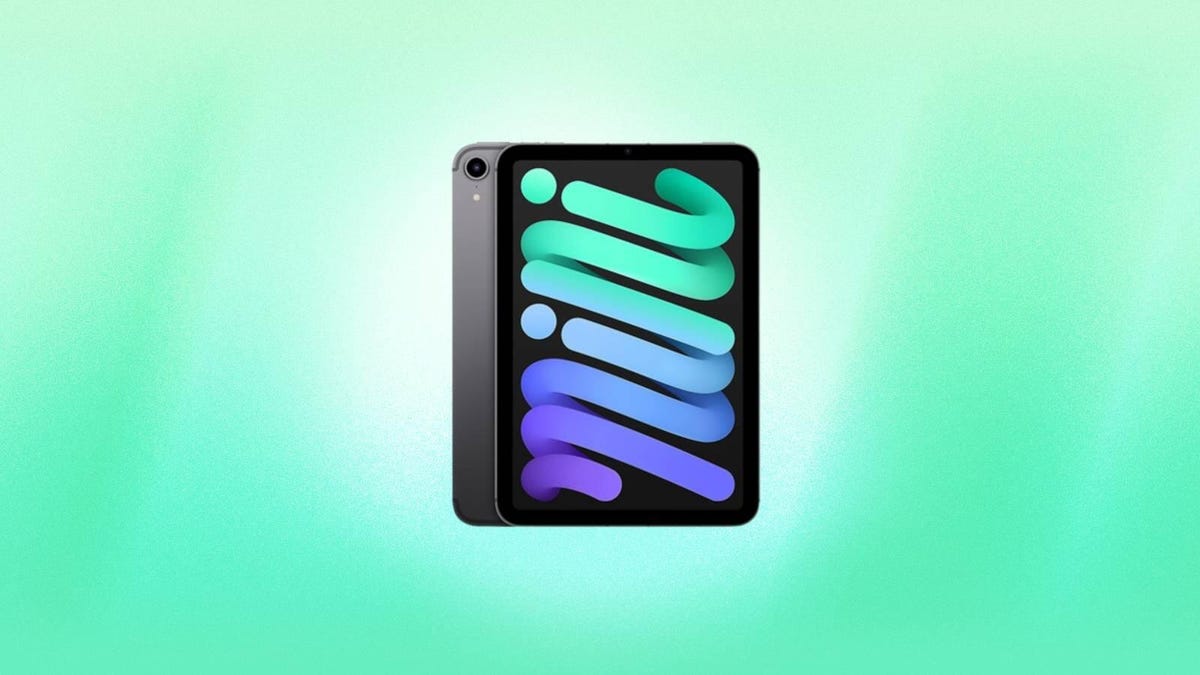
Apple makes some of the best tablets out there, and the 6th-gen iPad Mini is no exception. Not everyone want’s a mammoth screen size, which can be cumbersome for travel, and the latest-gen iPad Mini is our pick for the best smaller tablet you can get — especially because it still offers excellent performance. This iPad model typically goes for $649, but Woot has slashed the price to just $520 right now. That’s a $129 discount and $30 lower than the price at Amazon. This offer is available now through Nov. 11, while supplies last.
This particular model of the 6th-gen iPad Mini comes with 64GB of storage and features cellular capabilities, which means you can use it with a 5G carrier plan to stay connected on the go, even when there is no Wi-Fi available. It has an 8.3-inch Liquid Retina display, which is more compact and portable over other models, while still being conveniently larger than a phone. Plus, it has a fast A15 processor, a 12-megapixel ultrawide front camera, a USB-C port, Touch ID and all-day battery life.
It’s compatible with the Apple Pencil 2, which you can magnetically snap onto the side of this tablet to charge — but you’ll have to purchase that accessory separately. Our main gripe for this tablet came down to the price, so this deal makes it even easier to recommend.
I have been using, testing and reviewing 3D printers for the better part of a decade now, and I’ve seen a lot of 3D printer manufacturers come and go, especially those looking to capture the lower-end, budget sector. Two names have not only survived but flourished to become the leaders in this space.
Anycubic and Elegoo have always been part of the race to the bottom, and I don’t mean that negatively. Both of these Chinese companies have worked to bring as many advanced features as possible to 3D printers that are priced around the $300 mark. Auto bed leveling, power interruption alerts and material runout sensors were the purview of the best 3D printers, not the lower-end machines, until Anycubic and Elegoo started their contest.
Anycubic and Elegoo Spec Chart
Anycubic Kobra 2
Elegoo Neptune 4
Anycubic Kobra 2 Pro
Elegoo Neptune 4 Pro
Anycubic Kobra Max 2
Elegoo Neptune 4 Max
Build volume (mm)
220 x 220 x 250
225 x 225 x 265
220 x 220 x 250
225 x 225 x 265
420 x 420 x 500
420 x 420 x 480
Nozzle max temperature
260C
300C
260C
300C
260C
300C
Build plate max temperature
110C
100C
110C
110C (segmented)
90C
80C
Official max speed
300mm/s
500mm/s
500mm/s
500mm/s
500mm/s
500mm/s
Typical speed
180mm/s
180mm/s
300mm/s
250mm/s
180mm/s
180mm/s
Supported material
PLA, ABS, TPU, PETG
PLA, ABS, TPU, PETG, nylon
PLA, ABS, TPU, PETG
PLA, ABS, TPU, PETG, nylon
PLA, ABS, TPU, PETG
PLA, ABS, TPU, PETG, nylon
Connectivity
USB, Wi-Fi, App
USB, LAN
USB, Wi-Fi, App
USB, LAN
USB, Wi-Fi, App
USB, Wi-Fi
Slicer
Anycubic Slicer
Elegoo Cura
Anycubic Slicer
Elegoo Cura
Anycubic Slicer
Elegoo Cura
As you can see, when comparing the different models from Anycubic and Elegoo, each one is essentially the same as the others. Each of them has a 0.4mm nozzle and a direct drive extruder, as well as auto bed leveling and filament runout sensors. The standard Kobra 2 and the standard Neptune 4 are comparable, as are the Pro and Max versions of both. This means that no matter which of these printers you buy, you are going to get a very similar experience.
While some might see this as negative, I see it as a huge win for anyone looking to start 3D printing. With the Neptune 4 and Kobra 2 series and their Pro versions, you have four 3D printers for under $300 that can print well and print fast. They may not be as good in terms of quality as the best fast 3D printers that cost $600 or more, but for an entry-level printer, you really can’t beat them. And then you have the Max versions, behemoths capable of printing enormous models at high speed with good accuracy, all for $600 or less. It’s staggeringly good value.
So whichever brand you choose, Anycubic or Elegoo, know that your 3D printer will be a good one, and, to give you a little more detail on each, we have them listed below and why we like them.
One word of caution
While I firmly believe all of these printers are worthy of your time and money, they all suffer from one glaring issue: the software. While Elegoo uses a version of Cura that it has reskinned for itself, Anycubic currently has profiles for Prusaslicer that don’t always work the best. Both company’s slicer solution is not perfect, and for a beginner, they can be frustrating.
Anycubic and Elegoo need to spend some of their resources on making slicers they can be proud of or invest in heavy testing and working with Cura and Prusaslicer — two of the best 3D printing slicers — to produce quality profiles that are easy for users to understand and implement. It is the biggest barrier to entry for these budget-friendly 3D printers and one that can be solved with a bit of money.
Note: Normally, I’d tackle this kind of announcement with studied journalistic stoicism, but this new product from Elegoo is just too much fun for me to do that.
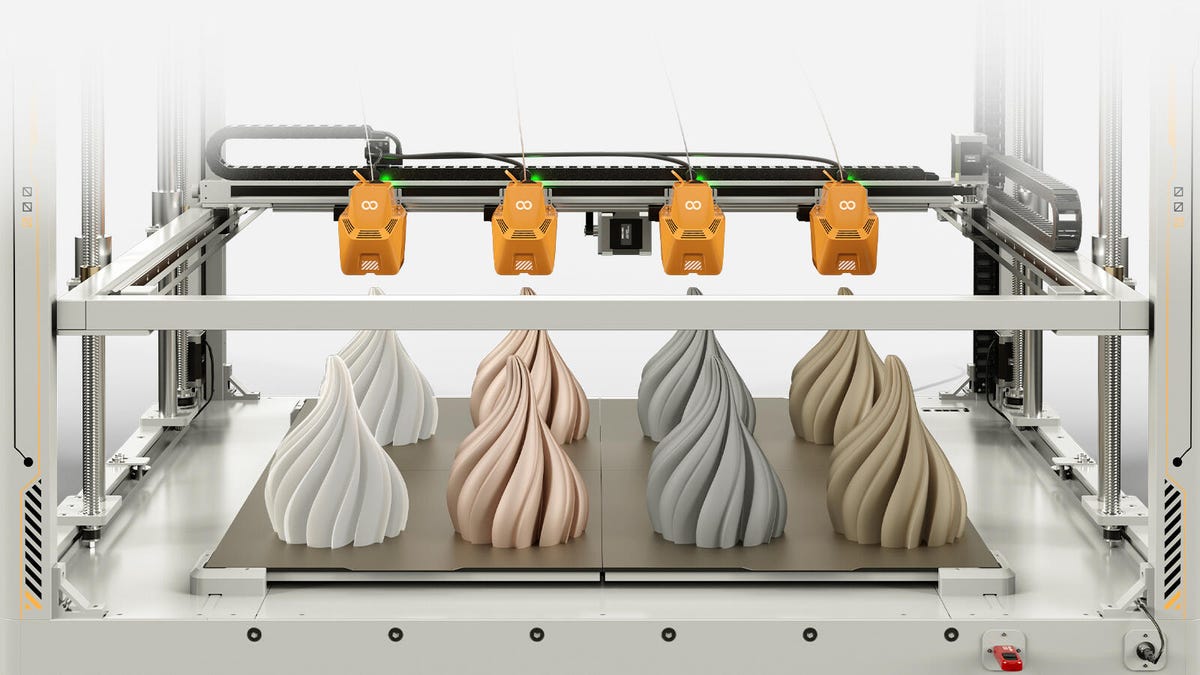
Today, Nov. 4, 2023, Elegoo, maker of excellent, albeit normally quite tame, 3D printers, is launching a Kickstarter for a printer that is, frankly, outrageous. Dubbed the OrangeStorm Giga (the greatest Kaiju name ever), it’s a printer with a build area of 800 by 800 by 1,000mm or 2.6 by 2.6 by 3.2 feet. Though Elegoo has said it’ll be aimed at the commercial market, there are plenty of reasons for small businesses and even hobbyists to jump on this if they can.
The sheer size of the Giga is enticing. With an 800mm square plate, you could print a full-size chest piece for an Iron Man outfit in one go, or produce prototypes for any number of projects. With a 1-meter tall build space, you can make giant vases for your home or full-size busts and artwork for your walls.
You can also add more print heads, to a max of four total, that can be used to print multiple models at the same time in various colors, making it a great way to mass-produce models for your small business. Those print heads can currently be used only to clone models, not make multiple color prints, and the standard model comes with only one head for now.
The Giga has a max print speed of 300mm/s, though Elegoo recommends 150mm/s, which is plenty fast enough when printing objects as large as this could conceivably print. If you were using the multihead version, you’d be printing four models at 150mm/s, increasing your output by 400%
This Kaiju 3D printer also has a segmented heated bed — parts of it can heat to different temperatures independently — so you can save money and power by heating only the section you need. If you’re printing smaller parts, you can print on one quadrant, and only that quadrant will heat.
The OrangeStorm Giga is available to back through Kickstarter as of Nov. 4, 2023, and though the retail price will be several thousand dollars, the earliest of early bird prices is $1,250, bringing it into the range of a small-business owner or even a hobbyist with money to spare. Remember, though, it is a Kickstarter, so it’s not a sure thing.
I love it when companies move out of their comfort zones and swing for the fences. Elegoo makes solid, dependable, budget 3D printers that work well and are great for beginners. Now, though, it also makes Kaiju. I love it, and I’ll be following along with interest.