Author: Admin

  • T-Mobile’s Autopay Change Complicates My Favorite Credit Card Perk

    T-Mobile is the latest carrier to change how it gives out auto pay discounts: Starting in July, customers are required to pay their bills using either a linked bank account or a debit card in order to receive a $5 per line discount on their service.

    However, if you already set up auto pay with a credit card, not complying with this policy change is effectively a price hike. And as a result, if you were paying for your phone bill using a credit card, you’ll now have to evaluate if the $5 per line cost is worth the convenience and perks that come with paying for your phone bill using that method. That’s not even including the need to use a debit card or give T-Mobile, which has a poor track record of data security, a bank account number.

    For myself, I rely on having cellphone insurance provided by a World Elite Mastercard that I pay my family’s cell phone bill with. While I haven’t yet had to file a claim with it, the perk allowed me to skip paying for AppleCare or my carrier’s phone insurance entirely. The benefit lets customers get reimbursed for cellphone repairs, up to $1,000 per year ($800 per claim, with a max of two claims per year).

    I’ve been hoping to at least use the options when replacing my iPhone 12 Pro Max’s battery after its capacity falls under 80% (an $89 cost), and it would be especially clutch if my phone ever required a major repair like a charging port failure (as expensive as $599).

    I manage three lines on my T-Mobile account, and as a result, continuing to pay with my credit card will lead to a $15 monthly increase on my rate when using autopay. So I began crunching the numbers in order to figure out whether it would be worthwhile to absorb the price increase to keep the credit card benefit, to forgo the benefit entirely or to consider a third-party phone insurance option. I also discovered a workaround, which should keep the benefit intact with a little bit of planning.

    iPhone 12 Pro Max with weather app

    Should I just join T-Mobile’s Protection 360?

    When I began researching my options for maintaining a phone insurance option, I first wondered if I could join T-Mobile’s Protection 360. T-Mobile’s phone insurance plan allows for phone service through AppleCare — which otherwise isn’t joinable past 60 days of buying an iPhone. Covering my line would be about $18 per month — more than the $15 per month that covers my family plan — but I could receive these repairs without having to file for reimbursement.

    Regardless, T-Mobile’s Protection 360 isn’t an option right now. Similar to health insurance, Protection 360 allows for enrollment either when you buy a new device or when a special enrollment period opens. I saw that there was an enrollment period open in June, but right now it’s closed, and T-Mobile doesn’t provide a cadence for how often it reopens.
    T-mobile logo

    What if I paid the price increase?

    While I don’t want to pay the extra $15 per month, it is a cost effective option if I insist on maintaining a level of phone insurance. As I covered in the Protection 360 section, paying $15 for three lines is less than paying $18 for a single line under T-Mobile’s option when it’s available. This would allow me to continue to be eligible for reimbursement after paying for a phone repair and help me avoid paying a high price should there be a catastrophic damage incident.

    However, I think there’s simply better ways to use that $15, especially when the main repair I inevitably see is an $89 battery repair. I could create a slush fund where I set aside that $15, and in six months that would build up to cover the $89 battery replacement that I foresee needing. I also just finished paying off my iPhone 12 Pro Max and could roll that amount into the fund. I currently plan on keeping my phone for two more years, and those savings could go toward my next phone purchase.

    But this option has a big vulnerability: If my iPhone suffered a major malfunction, a repair could cost $599 or result in being forced to buy a new phone earlier than I’d prefer.

    Apple logo on an Apple Store window

    Could I go with a third-party insurance option?

    There are other companies that offer insurance on phones or other electronics, without going through either the phone manufacturer or the phone carrier. One option that I looked into is SquareTrade, which is owned by insurance provider AllState. Through SquareTrade, I can get a plan for myself at $9 per month or a plan for the family (up to four lines) at $20 a month.

    Like my credit card’s phone protection plan, SquareTrade offers reimbursement for repair costs at Apple’s Genius Bar along with options for in-person or mail-away phone repair. That’s appealing because it will essentially allow for AppleCare’s support for a repair, albeit by paying upfront for it.

    However, SquareTrade’s deductible for all phone claims is rather high at $149. This is still a substantial discount from having to pay $599 for an equipment failure repair or $329 for a cracked screen replacement, but for a battery replacement I’d be better off paying Apple’s $89 repair cost.

    On the other hand, SquareTrade’s phone insurance remains flexible since I don’t need to have recently purchased my device to have it. It’s an option I can leave on the back burner, and if it seems appealing (or if I can tell that my phone is on the precipice of breaking), I could perhaps purchase it at a more strategic time.

    SquareTrade’s policy also doesn’t cover theft or loss, which are important possibilities to consider when choosing a phone insurance plan. My credit card benefit does cover that possibility, as does T-Mobile’s Protection 360.
    Stack of phones

    Why I’m waiting it out with a workaround

    While I’m not thrilled about T-Mobile’s choice to eliminate auto pay discounts for paying with a credit card, I’d also rather not be rushed into choosing a new phone insurance option. For now, begrudgingly, I am linking my bank account to pay for my bill in the interest of controlling costs while I evaluate these options.

    However, after I first published this story in July, I received several tweets from readers that offered a simple workaround that I verified with both my personal experience and confirmed with a T-Mobile representative. While I do now have my bank account linked to retain the autopay discount, I have not yet paid my bill using that account. Instead, I manually pay my bill using my credit card before the autopay date hits, and the discounts will remain on my bill. This is a small inconvenience since it will now require some conscious effort, but it’s more than worth it to keep the free cell phone insurance benefit.

    I will also start taking the monthly installment money I now have after paying off my phone, and start a new phone slush fund with it. Ideally, I’ll be able to get two more years out of my current iPhone and then use the savings toward a new device.

    By using that strategy for buying my next phone, I could then perhaps take advantage of a different credit card benefit: Some cards offer an extended warranty benefit that would provide an additional year of coverage beyond what’s provided with a purchase.

    At the same time, I’ll keep an eye out in case I later want to swap my auto pay back to a credit card and forego the discount, grab a SquareTrade plan or — when available — sign up for T-Mobile’s Protection 360.
  • Change These Goodreads Settings for a Better Experience

    Goodreads is one of the biggest online platforms for readers, counting 125 million members, and 3.5 million books on its shelves. The site lets users make digital bookcases where they can rate and review books and connect with friends, fellow readers, librarians and authors.

    Despite being one of the biggest reader hubs, Goodreads is far from perfect. Its bare-bones site can be frustrating to navigate, with some features only available depending on whether you’re using the website or app. And then there are the tumultuous review sections, which have recently prompted complaints from authors about users’ so-called review bombings.

    As an avid reader, I started using Goodreads because the platform made it easy for me to set and track my annual reading goals. But after using it for more than a year, I’ve spent a lot of time trying to find creative workarounds to customize my account. With these tried-and-tested tips, I’ll show you how to keep better track of your ever-growing to-be-read lists, stay up to date on new releases in your favorite genres, and navigate reviews like a pro.

    Here’s how to get the most out of your Goodreads account.

    Create custom shelves and tags

    Stacking your Want to Read Goodreads shelf is a great way to keep track of titles you might be interested in. But if you’re like me and that list is over 200 books long, it isn’t likely you’ll scroll through all those titles to find your next read.

    Instead, use one of the two options Goodreads has for creating custom collections: shelves and tags. You can name shelves and tags however you want and use them to track anything from a did-not-finish list to new releases to any book characteristic you want.

    Goodreads sets up every account with three exclusive shelves: Want to Read, Currently Reading and Read. Books that are shelved on one can’t also be shelved on another; they belong to only one of those places.

    There’s a way, though, to create a new custom shelf that isn’t exclusive: tags. A tag is a type of shelf that’s inclusive, meaning you can add multiple tags to a book, and the book will be seen under each tag.

    If you want to create new exclusive shelves, you can do that only on your desktop. But you can make new tags on your desktop or in the app. I recommend doing both on your desktop for a cleaner experience overall, but I’ll guide you through both processes.

    Here’s how to create a new shelf or tag on desktop:

    1. Open Goodreads and click on My Books in the upper-left menu.
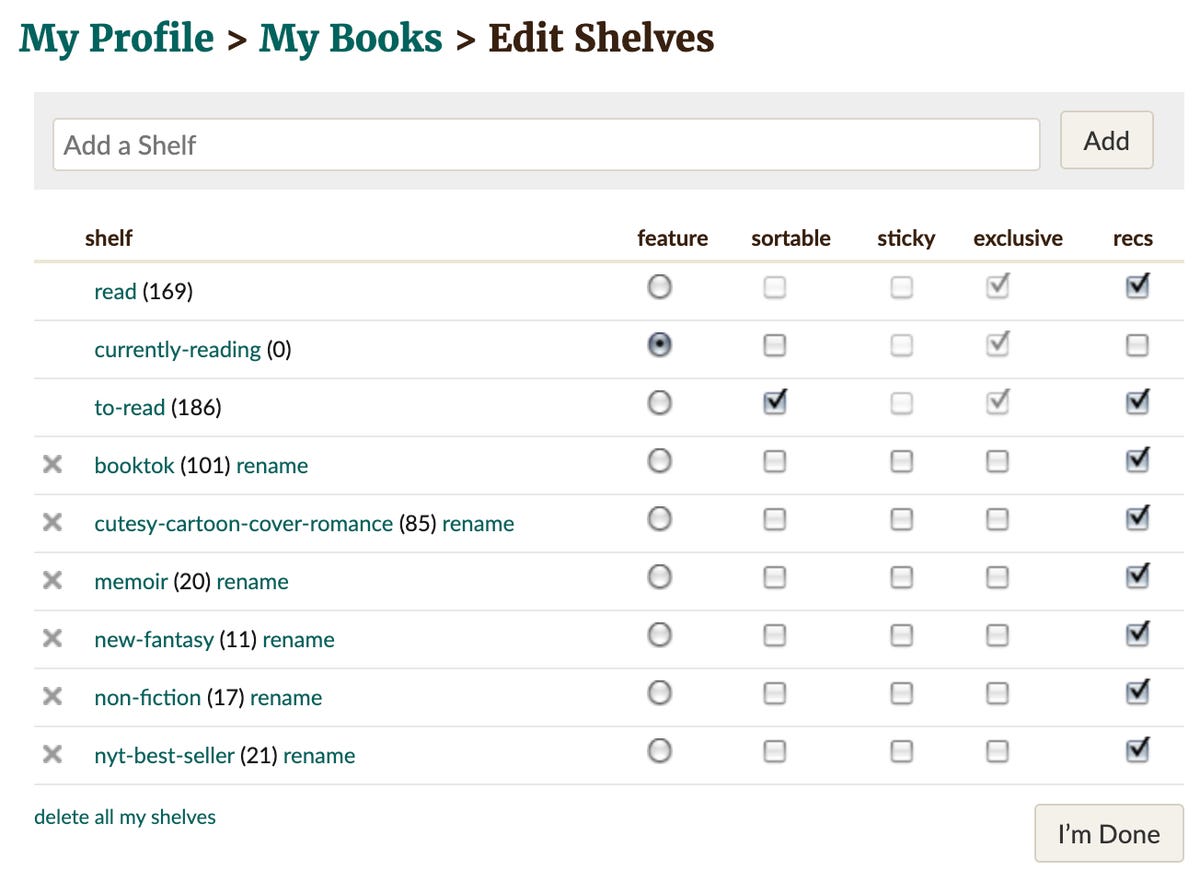
    2. On the left-side menu, next to Bookshelves, click Edit. This should pull up a grid of all your shelves and tags, along with several options across the top: feature, sortable, sticky, exclusive and recs.
    3. To create a new shelf, type in the name in the top search bar and click Add.
    4. For shelves: If you want this new shelf to be an exclusive shelf instead of an inclusive tag, you need to ensure that the box under that shelf for Exclusive is checked. It’s unchecked by default.
    5. For tags: If you want to create a tag, follow the same process to add a new shelf and then make sure the box under Exclusive is unchecked.
    6. Click I’m Done to save your changes.
    7. When you’ve found a book you want to add to a new shelf, click the downward arrow next to Want to Read and then select the shelf. After you’ve picked a shelf to add the book to, click Continue to tags to add tags to a book.
    Grid of Goodreads shelves and tags

    Here’s how to create a new tag in the app:

    1. Open Goodreads and tap the My Books tab at the bottom of the screen.
    2. Tap the green + Create a new shelf button below your existing shelves. Remember, Goodreads considers all tags to be a type of shelf.
    3. Type in the name you want.
    4. Tap Create Shelf. In the app, Goodreads automatically categorizes all new shelves to be inclusive, so you don’t have to worry about adjusting the settings for a tag.
    5. When you want to add a book to a new shelf, click the downward arrow next to Want to Read and select the shelf you want. If you don’t see the new tags, click More Shelves to show them.

    If you later decide you want to change the exclusivity of a shelf or tag, you can always change the settings under the exclusive column from your desktop.

    Bookmark your favorite genres

    Help out Goodreads (and yourself) by bookmarking your favorite genres, and watch as Goodreads’ recommendations for you go from random to helpful. Even if you have wildly diverse reading tastes, marking your top genres can help Goodreads understand what books might be of interest to you instead of taking a shot in the dark.

    Here’s how to bookmark your favorite genres on desktop:

    1. Open Goodreads and click on your profile picture in the top-right corner.
    2. Select Favorite genres.
    3. Check (or uncheck) your favorite genres.
    4. Click Continue.
    5. Goodreads will then prompt you to rate some of the popular books in those genres. Shelve and rate as many or as few books as you’d like.

    Here’s how to bookmark your favorite genres through the app:

    1. Open Goodreads and tap the My Books tab at the bottom of the screen.
    2. Below your shelves and your reading challenges, there’s a section named Add Books from Favorite Genres.
    3. Click Edit.
    4. Select your favorite genres.
    5. Tap Save in the upper-right corner.

    Though there isn’t much public information about Goodreads’ recommendation processes, one Goodreads Help page from 2020 notes that leaving star ratings, creating shelves, and marking books you aren’t interested in as such are also helpful ways to steer your recommendations in the right direction.

    Understand how Goodreads reviews work

    As with any platform that lets people leave reviews, the book reviews on Goodreads are a mix of helpful, irrelevant and, sometimes, hot garbage. For popular authors or newly released books especially, thousands of reviews — of varying degrees of usefulness — can clutter the review section and make it hard to understand whether a book might be right for you.

    Though there’s only so much you can do on your end to block out some of the noise, there are ways to sort through and find credible, trustworthy reviews.

    Here are some tips for navigating reader reviews on Goodreads:

    • Compare the star rating to the number of reviews. This quick test can give you an idea of how widely read and well received a book is. The more ratings there are, the more robust the rating is.
    • Check to see if a reviewer has disclosed whether their review was sponsored by an author or publisher. Under Goodreads’ review guidelines, reviewers who receive a free copy of a book are required to disclose that in their reviews.
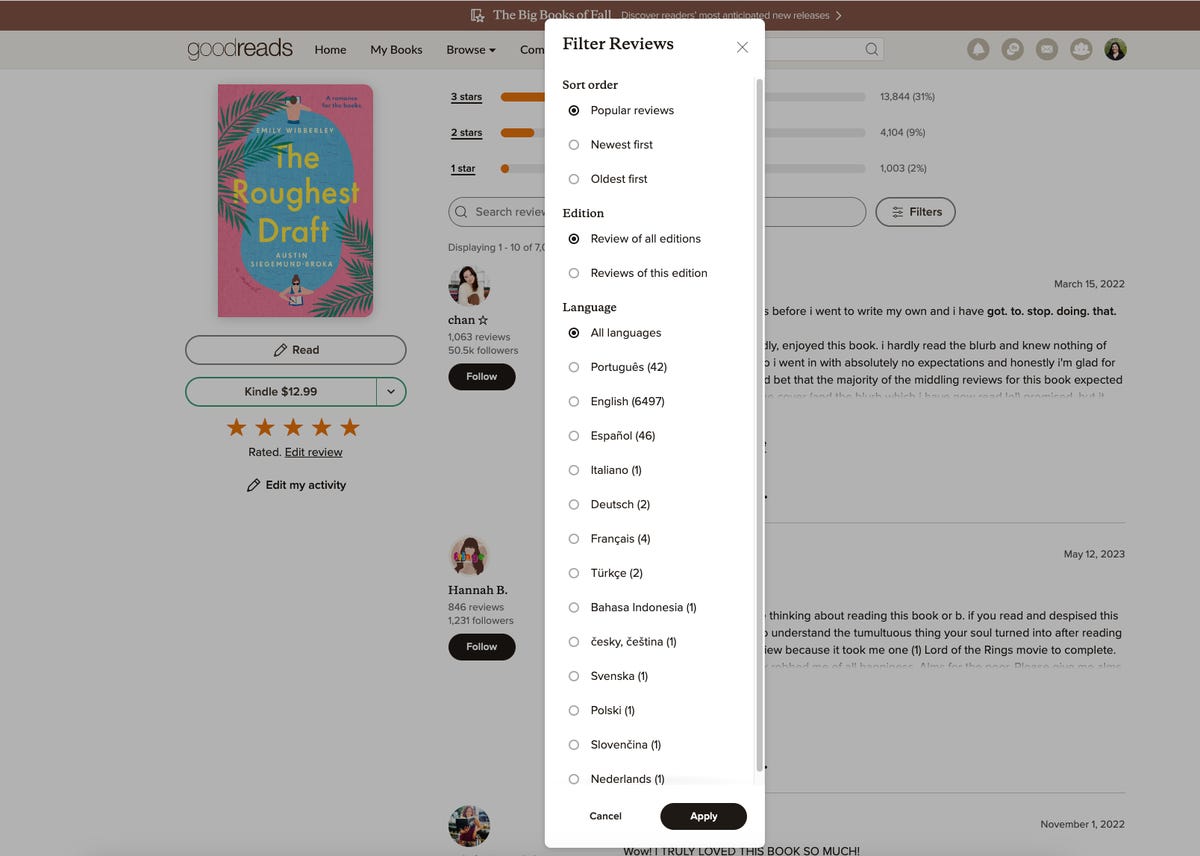
    • Change the way reviews are sorted. I recommend sorting by the popular reviews — while reviews with more likes or comments aren’t inherently more trustworthy, they tend to be more helpful than others.

    To change the way reviews are sorted on your desktop, find the book you’re looking for, scroll down to Reviews > Filters > Sort Order > Popular Reviews.

    In the app, the only way to sort reviews is by star rating. Scroll down to the reviews section, click on the graph of star ratings, then on the individual bar you want to see, to show only reviews that gave the book that number of stars.

    List of options for filtering Goodreads reviews

    Another way to navigate reviews is to look at the reviewers themselves. Goodreads keeps a running list of the top reviewers, as well as the most popular reviewers. Top reviewers have posted the greatest number of reviews in a specific time period, while the most popular reviewers have received the most likes and comments on their reviews.

    Here’s how to find the most popular and top reviewers on desktop:

    1. Open Goodreads and click on the Community tab in the top menu.
    2. Click People.
    3. Using the menu on the right, you can now navigate through Goodreads’ list of top readers, top reviewers, most popular reviewers, most followers and top librarians.

    Though you’re only able to find the top and most popular reviewers on desktop, if you find reviewers whose work you like or want to see more of, you can follow their accounts. Then their reviews will appear on your main home page on the desktop and in the app.

    For more, check out how to read ebooks for free from your local library, the best e-readers of 2023 and 6 tips to get through a reading slump.

  • Got a New iPhone? Take Your Best Photos Ever with These Pro Tips

    We gave Apple’s iPhone 14 Pro a CNET Editors’ Choice award for a variety of reasons, but one of the biggest was its awesome triple camera system. It can take beautiful photos that comfortably rival shots from the best camera phones out there, including Samsung’s Galaxy S23 Ultra and Google’s recent Pixel 7 Pro. It takes great photos at night, too.

    The iPhone’s powerful combination of gorgeous image quality, software processing and advanced features, such as Apple’s own ProRaw image format, means the iPhone’s images can look like they were taken on a professional-level camera.

    Then there’s the wide array of amazing photo editing apps available on iOS that can help turn even a regular image into an eye-catching piece of digital art.

    But simply having a great camera isn’t the only thing you need to take award-worthy images. Knowing the tricks of the trade will make the difference between coming home with some fun snaps and coming back with beautiful photos you can’t wait to print and frame for your wall.

    Here, then, are my top tips for better images, techniques that I use every day as a professional photographer, from working with the light to using more-creative angles to polishing up your shots in editing apps. Many of these tips will apply on any recent phone you may have, including the base iPhone 14 or older models like the iPhone 13 and iPhone SE and even many Android phones. Looking for a new phone for taking photos? Check out our guide to the best camera phones.

    Know when to use the different lenses

    fishing boats

    It’s easy to stand in front of a picturesque scene and flick between the normal, super wide and zoomed views on the phone, but it’s more difficult to understand exactly why one might be better than the other for a particular composition. To figure it out, you need to take an extra moment to look at what’s important in the scene in front of you.

    Is there a particular subject — perhaps a statue or an impressive building — that’s surrounded by lots of other elements like trees, sign posts or street lights? Using the iPhone 14 Pro’s 3x telephoto zoom here is a great way of isolating your subject and eliminating all those distractions. You may need to move back a bit and then zoom in to keep it in frame, but simplifying your scene like this will help your subject stand out.

    But perhaps it’s those extra surrounding elements that really add to the scene and provide context for where you are. In that case, using the standard zoom will allow you to keep those items in the shot. Switching to the super wide view will capture even more of the surroundings. So to avoid your subject getting lost in the frame, you might want to move closer and find interesting foreground objects (a patch of flowers, a cool-looking rock) to add to the composition.

    Revisit at different times of day

    Edinburgh at sunset
    Edinburgh on a cloudy afternoon

    The awesome low-light skills of the iPhone 14 Pro mean you’re not limited to only taking photos at midday when the sun is at its highest. Sunrises and sunsets will typically be darker, but may reward you with beautiful colors in the sky and great contrast in the light being cast. Landscape photographers know that getting up before dawn can often yield the best results and it’s something that’s always worth keeping in mind, if you can stomach the early rises.

    If you’re willing to try a sunrise shoot at least once, visit the spots you’ve already shot and see how they’re transformed by the different light. It’s this that will separate your images from the hundreds of others on Instagram who just took a snap after their morning coffee.

    Don’t be afraid of the dark

    boats on a quay lit up at night

    Don’t think that once the light goes altogether you need to stop shooting. The iPhone 14 Pro has one of the best night modes on any phone and can take astonishing night-time photos. City scenes, with car headlights, vibrant shop window displays and even festive holiday decorations can provide superb fodder for night shots. And don’t worry if it rains. Those wet streets will now reflect all of those lights, which can look amazing.

    Check out our tutorial If you want to get even better results from your night-time phone photography.

    Shoot in ProRaw, edit your shots later

    a photo of two people climbing stairs, one version in color, the other in black and white

    A few careful tweaks in editing apps like Adobe Lightroom can make all the difference between an everyday snap and a beautiful piece of art. Thankfully, Apple has made this even better with the introduction of ProRaw.

    ProRaw is much the same as shooting in raw on regular DSLRs; it doesn’t save all the image data, allowing you to change white balance and alter colors much more accurately after you’ve taken your shot.

    It also captures more detail in the shadows and highlights of your images, giving more scope for rescuing those bright skies with the highlights slider or bringing back a bit more visible detail in the darker shadows. You’ll see the raw button in the top corner of your screen when you’re in the camera, so make sure it doesn’t have a line through it if you’re taking an image that you know you’ll want to polish up later to look its best. You can edit JPEG images too. I’s just that you won’t have quite the same level of flexibility.

    I use Adobe Lightroom Mobile for most of my phone editing. It’s a professional tool and has a lot of granular control over color and exposure, while also syncing my images to the cloud so I can pick up my edits later on my iPad or my desktop computer. If you don’t fancy the monthly fees, Google’s Snapseed is free and also has a lot of superb features for getting the best from your shots, including a variety of film effects that give some beautiful color toning to your photos.

    If you want to get a bit more wild and creative, you should check out apps like Bazaart and PicsArt, which provide a variety of tools and effects for compositing images to turn them from photos into often bizarre pieces of modern art. Take a look at my roundup of image editing apps for more ideas.

    Remember that there is no right or wrong way to edit your images, and applying creative effects doesn’t mean deleting the original file — so you can always go back and try again if you don’t like the result. My advice is to get a cup of tea, sit back in a comfy chair and spend some time playing with your editing app of choice and seeing what you can create. You may be surprised at what you can come up with, even from images you took some time ago.

  • This Convenient All-in-One LG Eclair Soundbar Is $200 Off at Best Buy

    There are plenty of pricey multi-speaker setups out there that can provide immersive surround sound for all your shows and movies. But you don’t have to rearrange your entire living room — or break the bank — to upgrade your TV’s audio. The LG Eclair is a compact all-in-one soundbar that packs a big punch, and for today only, you can pick it up for $200 off. That drops the price down to just $250. However, this deal is only available through 9:59 p.m. PT (12:59 a.m. ET) tonight, so be sure to get your order in before then if you don’t want to miss out on these savings.

    This convenient single-piece LG soundbar provides powerful sound without taking up too much space. It’s a 3.0-channel soundbar, and it’s equipped with four passive radiators for rich sound and deep bass tones without needing a separate subwoofer. It also features Dolby Atmos and DTS:X support for immersive spatial audio that fills the entire room. Plus, it even allows you to play sound through the soundbar and your TV’s speakers simultaneously for a serious home theater experience. And it has Google Chromecast and Apple AirPlay 2 built-in, so you can easily stream music and other audio from your phone, tablet or laptop wirelessly.

    And if you’re in the market for a different model or setup, you can check out our full roundup of all the best soundbar deals for even more bargains.

  • Sign Up for a Year of WP Engine Web-Hosting and Get 4 Months Free

    Whether you’re looking to promote yourself or your business, having a strong online presence is an absolute necessity. Fortunately, it’s never been easier to build yourself a website, and right now, it’s a lot cheaper too. WP Engine offers WordPress web and e-commerce hosting, and when you use the promo code WPE4FREE to sign up right now, you’ll get four months for free. You’ll have to pay for the entire year upfront to get this deal, but it could save you as much as $1,400 depending on your plan. There’s no set expiration for this offer, so get signed up soon if you don’t want to miss out on these savings.

    WP Engine didn’t quite make our list of the best web-hosting services for 2023 because it only supports WordPress. But if that’s your preferred content management system, then this is a deal you won’t want to miss. The basic plan includes support for one website with up to 25,000 monthly visits, 10GB of storage and 50GB of bandwidth per month. Prices start at $240 for the year if you only want WordPress hosting, which is $120 off the usual price. If you want e-commerce support for your site as well, the price jumps up to $288 for the year, which saves you $144.

    WP Engine also lets you customize your plan a bit, and you can upgrade all the way up to hosting for over 30 sites with more than 400,000 monthly visits, with prices starting at $2,320 for the most advanced plans. And all plans include 24/7 support, WordPress-specific security, daily backups, 10 premium WordPress themes and much more.

    And if you want to check out some other web-hosting services, we’ve rounded up even more great bargains that you can take advantage of right now.

  • Best OTA DVR for Cord Cutting

    Cable and satellite can get expensive, but you don’t have to pay a huge monthly bill to watch TV. If you live in a city or town with good over-the-air reception, putting up a TV antenna is an easy way to cut the cord and get access to free TV. Pair an affordable antenna with an OTA recorder, and you’ll be able to pause live TV, save your shows for later and fast-forward through commercials. Many of the DVRs we’ve tested will even let you stream your recorded content to multiple TVs or when you’re away from home.

    The downside is that “free” can turn into, well, not free, especially if your DVR charges a monthly fee. For example, a basic DVR like the AirTV 2 starts around $100, before you add a hard drive, while a TiVo Edge with all the bells and whistles is currently $499 (with lifetime subscription). Yet, compared with the cost of cable TV and live TV-streaming services such as Hulu Plus Live TV or YouTube TV, even the most expensive antenna DVR will pay for itself in due time.

    It’s worth mentioning that the next version of the ATSC broadcast standard, called NextGen TV, is now available in over 60% of homes. NextGenTV promises visuals in up to 4K resolution in the future, as well as interactive features not possible with standard broadcast. Some TVs have onboard NextGen tuners, and while there’s at least one DVR available for it — the HDHomeRun Flex 4K — it’s currently uncertain if that device will be able to meet the newest DRM requirements. Meanwhile, the competitive Tablo ATSC 3.0 Quad HDMI OTA DVR has been delayed for the foreseeable future. As NextGen TV isn’t expected to come online fully till at least 2024, we’ll cover such DVRs in a future update.

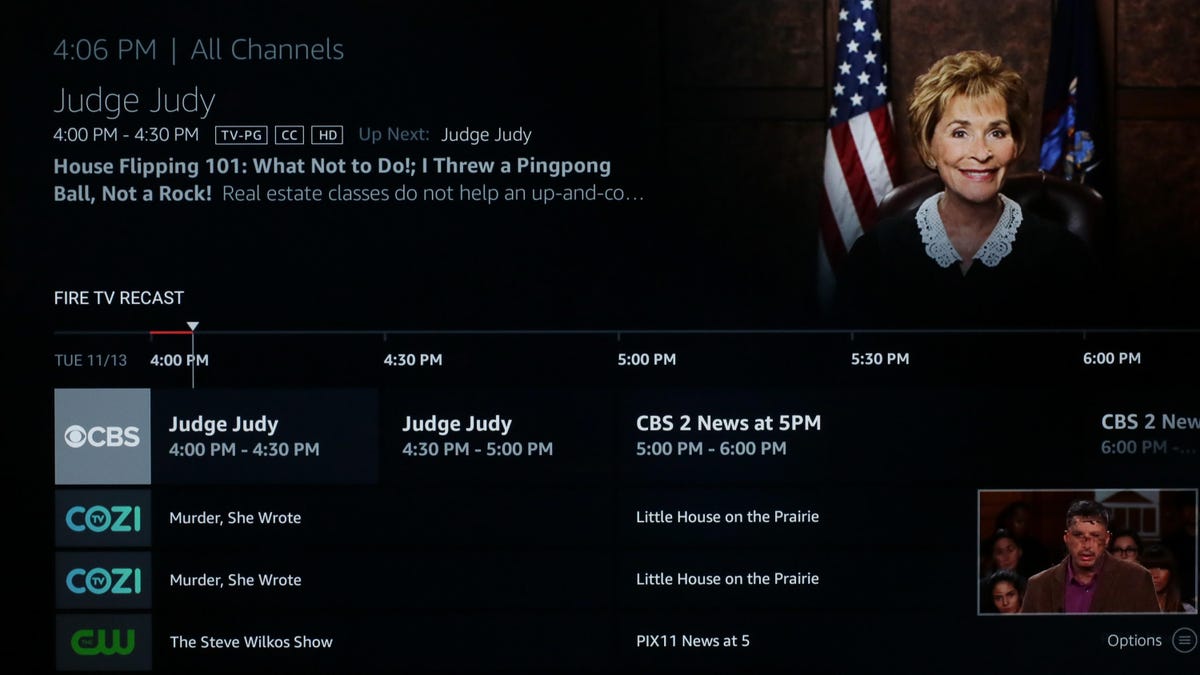
    There are three standout OTA DVR products to consider when buying a cord-cutting digital video recorder: the AirTV 2 and the TiVo Edge for antenna, and the Nuvyyo Tablo Quad. Each has its own unique features, tuner and capabilities, but there’s one I’d recommend to beginners and old hands alike. Sadly, our previous recommendation, the Amazon FireTV Recast, has been discontinued. Let’s dive in and take a look at the best OTA DVR options.

    Types of OTA DVR: Set top vs. networked TV streamer?

    There are two main types of DVR options: a traditional set top, which connects directly to a single TV via an HDMI output; or a networked TV streamer, which streams to your devices over the internet. The TiVo Edge for antenna is a traditional set-top (which also has in-home streaming) while the AirTV 2 and Tablo Quad are straight networked TV streamers.

    A set-top is best for people who usually watch on one TV, while a network device is for people who want to watch on multiple devices — a streamer like a Roku or other devices like phones and tablets. In general a networked TV streamer is the more flexible OTA DVR option, and can better complement live TV streaming apps or services like Netflix.

    tivo-bolt-ota-11

    Other features to look for

    Regardless of which style of OTA DVR you choose, there are some features common to both that you should look for.

    • Two or more HD tuners: One tuner is just not enough. When it comes to HD (or eventually 4K) tuners, the more your device has the merrier. The bare minimum is two so you can record two channels at the same time, or watch one while you record another, but heavy antenna heads might appreciate even more.

    • 1TB or more of storage: Depending on the device you have, a terabyte of built-in storage space should offer about 150 hours of program content. But if you choose a device such as the TiVo, which automatically records shows it “thinks you like,” you could run out very quickly. Which is why you also need…

    • The ability to add extra storage via USB or SD card: An external hard drive is an excellent option, providing your DVR doesn’t need a proprietary model. Generally, a 1TB external hard drive is cheap at about 50 bucks.

    02-amazon-fire-tv-recast
    • 14 days of guide data: While seven days is really the minimum useful amount, two weeks gives you more flexibility.

    • No ongoing fees: Most people cut the cord to save money, so paying yet another monthly fee doesn’t make a ton of sense. TiVo does offer a lifetime service option so you pay for the device and guide data upfront.

  • Xbox Series X Storage Upgrade with WD Black C50 Is Cheap and Easy

    Running out of storage space on a console is a common occurrence. Time and time again I see a game I’m interested in available on Xbox Game Pass and when I try to download it, my console says it’s running out of space and I’ll need to make room by deleting games I’ve already installed. What makes things easier, and cheaper, is plugging in the WD Black C50 Expansion Card, starting at 512GB for $80.

    When Microsoft launched the Xbox Series X and S in 2020, the company gushed over how easy it was to upgrade the consoles’ storage and load games directly from the card. No more opening up the Xbox or using an external drive: You can double the built-in storage just by plugging a memory card into a slot. At the time, though, only Seagate had the rights to make the cards, and they weren’t cheap at $220 for 1TB. Microsoft dropped the price of those cards back in May, making them and the C50 the same price.

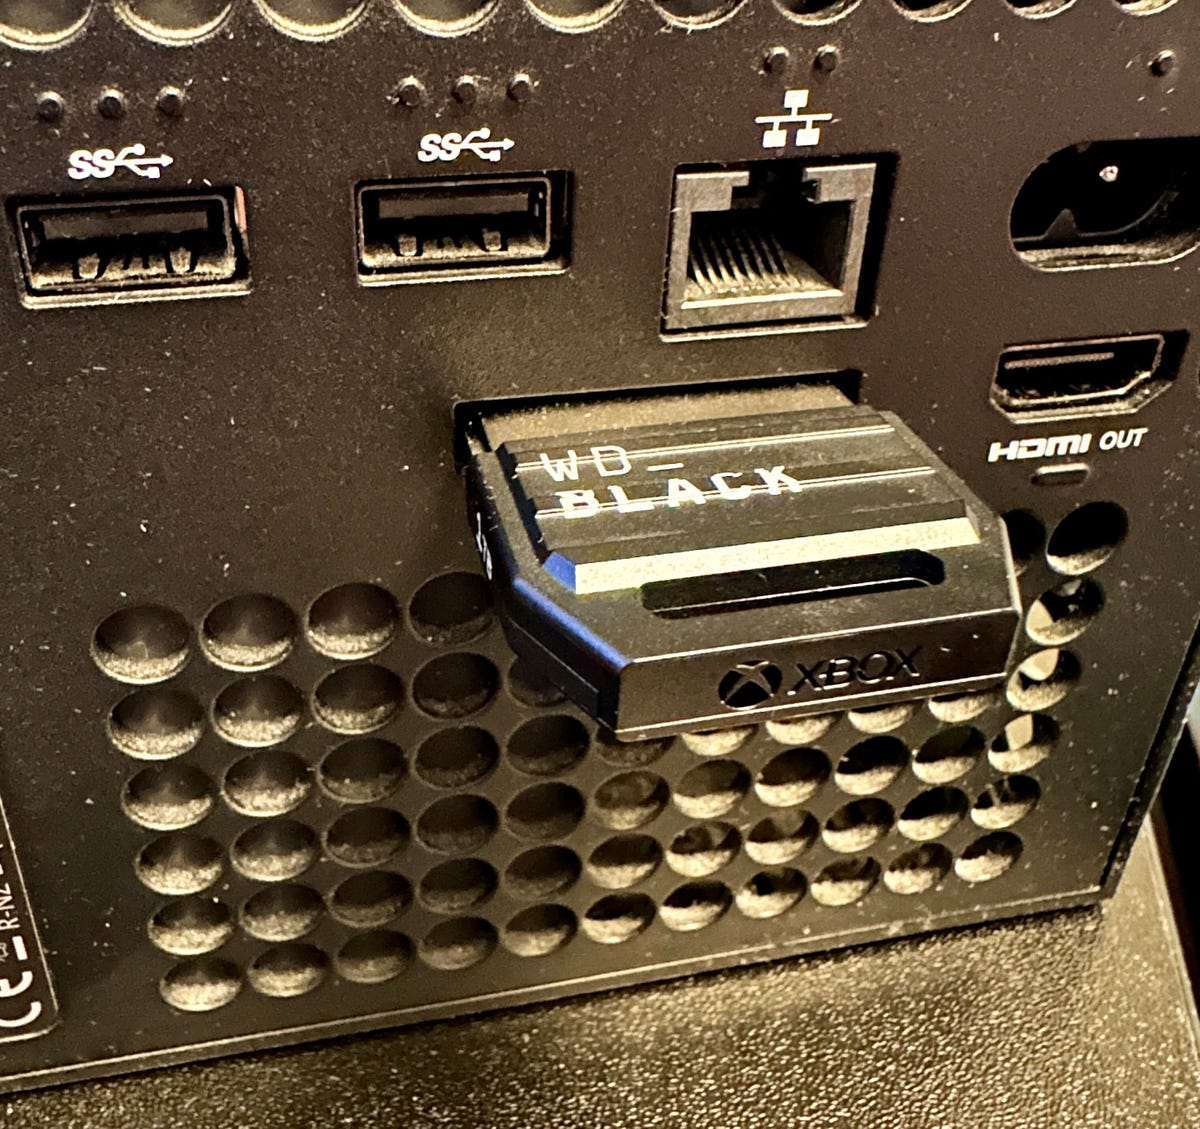
    The C50 is available in two options: the 512GB at $80 ( 90) or 1TB at $150 ( 150). Both are the same physical size and all-black design.

    Seeing the card reminded me of the memory cards from back in the days of the original PlayStation and PS2. And like those cards, the upgrade was just as easy.

    It took me more time to turn around my Xbox Series X without unplugging any cables than it did to insert the card into the slot on the back.

    a wd black c50 card installed on an xbox series x

    Once installed, the console will immediately recognize the increase in storage and you’re done. If you want to move games to the card, you’ll need to press a few extra buttons to begin the transfer, an operation I think could be streamlined a bit. Games launched from the card might take a little longer to start, but it’s not noticeable compared to the overall load time.

    Upgrading your Xbox Series console’s storage may not be required for most gamers, but if you’re like me and like having a collection of games available without having to redownload them, you should consider Western Digital’s Black C50 Expansion Card.

  • Galaxy S24: All the Biggest Rumors About Samsung’s Next Phone

    Samsung’s Galaxy S23 series has really impressed us, from the entry-level model, with its solid all-round performance, to the top-end S23 Ultra, with its incredible camera system and S-Pen stylus.

    But the tech world doesn’t sit still for long, and already we’re seeing rumors about Samsung’s next generation of phones, the Galaxy S24 line. We’ve sifted through the output from the rumor mill to try to figure out just what Samsung’s next superphones will offer, when they’ll be announced, and how much they might cost.

    All rumors should be taken with a pinch of salt. And they’re unlikely to stop rolling in, so we’ll keep this article updated as we hear more.

    When will the Samsung Galaxy S24 launch?

    Samsung took the wraps off the S23 line and S22 line at Galaxy Unpacked events in February 2023 and 2022, respectively. We strongly expect the company to follow the same timeline for the next models, with a February 2024 launch event and the phones going on sale within the following weeks.

    pixel-7-pro-s22-ultra-lanxon-promo-57-copy

    How much will the Galaxy S24 cost?

    There aren’t any firm details on pricing, but we don’t expect any significant changes from the S23 lineup. For reference, the base S23 model starts at $800, the Plus at $1,000 and the Ultra at $1,200. The Galaxy S lineup has different models for people shopping on different budgets and it’s a tactic Samsung has used for most generations of its phones.

    The new Galaxy Z Flip 5 and Z Fold 5 both maintained their prices from last year, so it doesn’t generally appear that Samsung is looking to shake up its pricing strategy.

    Will there be multiple Galaxy S24 versions?

    Almost certainly, yes. As mentioned, the multiple models strategy is one that Samsung has used for some time, and all current rumors suggest the company will launch at least two versions of the S24: a base model and an Ultra version. Some industry analysts have suggested that the Plus model might be scrapped to create more separation between the base and Ultra, but other sources disagree.

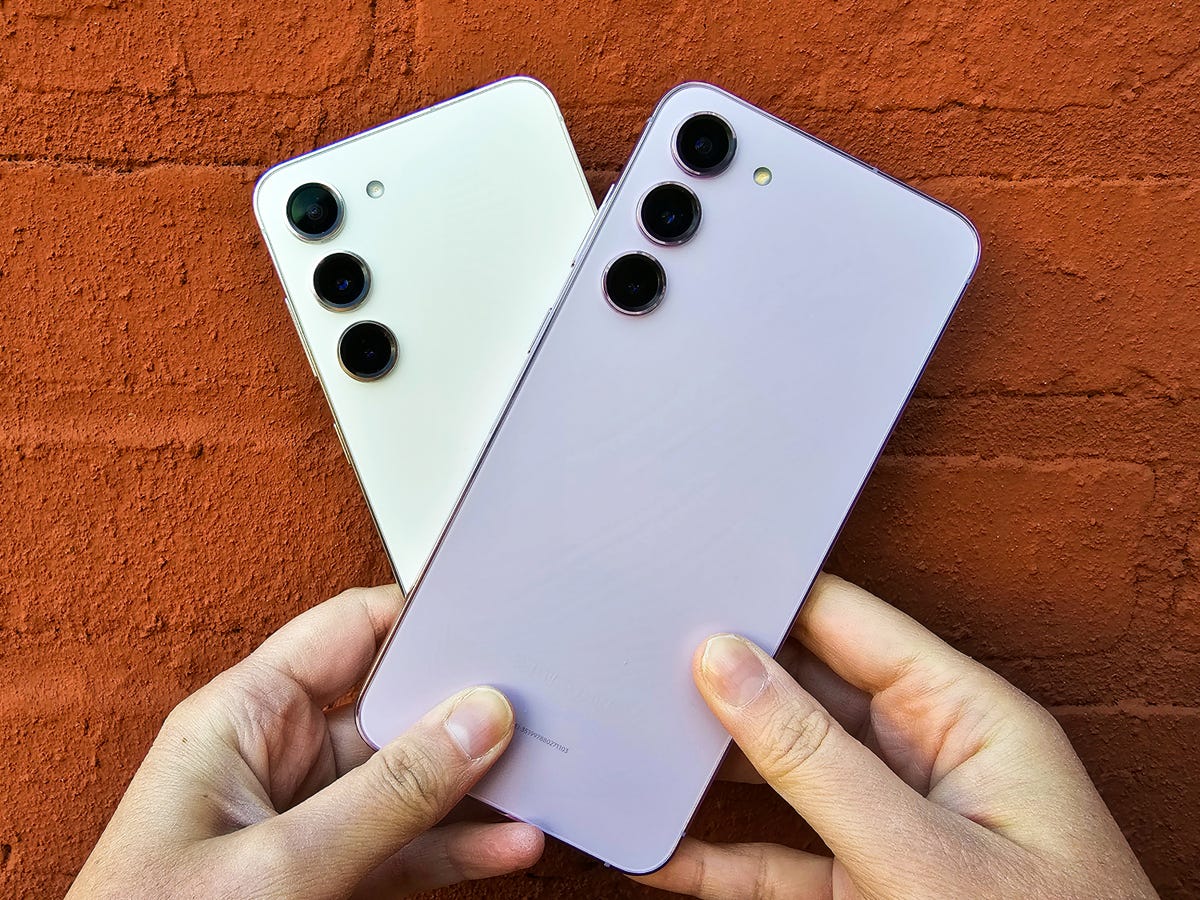
    The Galaxy S23 (left) and S23 Plus (right) against a brick wall

    What about the Galaxy S24 series design and display?

    Tipster @Tech_Reve suggests Samsung will be sticking to much the same design as this year, at least for the base S24 and S24 Plus. Both phones are expected to maintain the floating camera lenses, rather than the solid camera unit seen on the earlier S22 and S22 Plus.

    The S24 Ultra may get some more-noticeable tweaks, if only in the reduction of the number of camera lenses visible on the back. Tech_Reve predicts that the S24 Ultra will lose the 3x camera lens, which will mean fewer lenses in the camera cluster — though that may not be the case, as we’ll discuss later. Other rumors suggest the Ultra model will be made with a lighter, stronger titanium frame, but whether that’s visually noticeable remains to be seen.

    Most rumors suggest that the display sizes will remain pretty much the same as last year, meaning we expect a 6.1-inch base Galaxy S24, a 6.6-inch S24 Plus and a 6.8-inch S24 Ultra.

    Samsung Galaxy S23 Ultra

    And the Galaxy S24 series cameras?

    Rumors aren’t clear about what exactly to expect when it comes to the cameras in the S24 range, with some earlier reports saying we’ll see a much larger main camera sensor, and other more recent rumors suggesting the camera specs will remain essentially the same.

    The latter rumors come chiefly from known leakster Ice Universe, a source with an excellent track record, so the talk of a bigger main camera sensor is arguably less exciting. That’s a shame, because the S23 Ultra’s cameras haven’t really changed that much for a few generations, while competition from both Apple and Google has remained fierce. A larger camera sensor could make a significant difference in improving image quality. That said, Ice Universe has also suggested that the S24 Ultra’s 3x zoom may get a resolution bump up to 50 megapixels.

    Other rumors suggest the Ultra will lose the dedicated 3x optical zoom lens and instead go all in with the 10x optical zoom, upgrading it to allow for different zoom levels. A continuous optical zoom has been rumored for some time, but if Ice Universe is to be believed, we may have to wait another generation to see it in use.

    How about the Galaxy S24 series specs?

    Though it’s almost certain some S24 models will use the upcoming Qualcomm Snapdragon 8 Gen 3 processor, expected to be launched later this year, reports suggest Samsung may revert to using its own Exynos chips in certain regions.

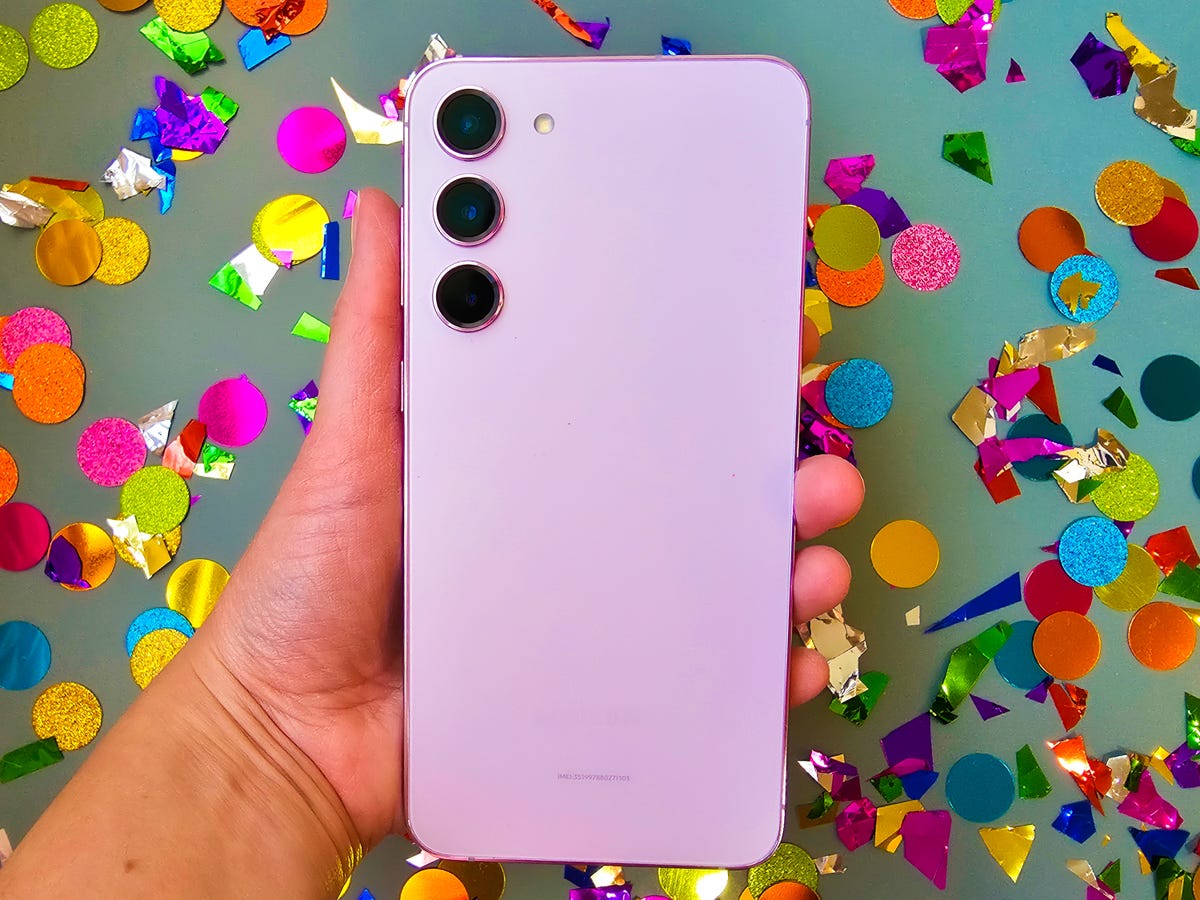
    The Samsung Galaxy S23 Plus

    In earlier generations, including the S22 line, Samsung used Qualcomm chips in some regions (including the US) but opted for its own Exynos processors in other areas (including the UK). The reasoning wasn’t always clear, but it was notable that the S23 line used Qualcomm silicon in all regions, with no hint of Exynos.

    Rumors about Samsung’s S23 FE, the more affordable version of the range, expected later this year, suggest it’ll use Exynos chips. And it’s possible Samsung will again opt for a mix of chips for the S24 range when it launches next year.

    Other leaks suggest that the base S24 and S24 Plus could get a bump up to 12GB of RAM, with the Ultra going up to 16GB.

    Anything else?

    At this point there aren’t many other credible rumors. We do, however, expect Samsung to stick with the S Pen stylus in the S24 Ultra, as well as introduce a new range of colors throughout the whole series. We’d love to see a return to expandable storage (but that won’t happen), and you can expect features like IP68 water resistance, in-screen fingerprint scanners and high refresh rate displays on all models.

  • Spain vs. England: How to Watch FIFA Women’s World Cup 2023 Final Live From Anywhere

    There will be a first-time World Cup winner in 2023. Spain will meet England in the Women’s World Cup final with both squads hoping to bring home their first World Cup.

    England is expected to be the favorite in the game, having had a dominant tournament. They won Group D, survived Nigeria in the round of 16 and won the last two games without their new star, Lauren James, who was suspended for stomping on a player’s butt. She will back in uniform on Sunday, when England looks to win its second major tournament following its win in the European Championship last summer. England beat Spain in the quarterfinals of that tournament by a score of 2-1.

    Spain has yet to win a major tournament, but has looked strong in this World Cup. They placed second in Group C, but dominated Switzerland in the round of 16. They beat the Netherlands 2-1 in extra time in the quarterfinals and secured their place in the final by besting Sweden in the semifinals by the same score.

    Below, we’ll outline the best live TV streaming services to use to watch Spain vs. England, no matter where you are in the world.

    The FIFA Women's World Cup Winner's Trophy standing on a plinth in front of a blue background.

    Spain vs. England: When and where?

    This Women’s World Cup final takes place at Stadium Australia in Sydney on Sunday, Aug. 20.

    Kick-off is set for 8 p.m. AEST local time in Australia, which makes it a 6 a.m. ET or 2 a.m. PT start in the US and Canada, a 10 p.m. NZST start in New Zealand and an 11 a.m. BST kick-off in the UK.

    How to watch the FIFA Women’s World Cup final 2023 online from anywhere using a VPN

    If you find yourself unable to view the final locally, you may need a different way to watch this match — that’s where using a VPN can come in handy. A VPN is also the best way to stop your ISP from throttling your speeds on game day by encrypting your traffic, and it’s also a great idea if you’re traveling and find yourself connected to a Wi-Fi network, and you want to add an extra layer of privacy for your devices and logins.

    With a VPN, you’re able to virtually change your location on your phone, tablet or laptop to get access to the game. Most VPNs, like our Editors’ Choice, ExpressVPN, make it really easy to do this.

    Using a VPN to watch or stream sports is legal in any country where VPNs are legal, including the US, UK and Australia, as long as you have a legitimate subscription to the service you’re streaming. You should be sure your VPN is set up correctly to prevent leaks: Even where VPNs are legal, the streaming service may terminate the account of anyone it deems to be circumventing correctly applied blackout restrictions.

    Looking for other options? Be sure to check out some of the other great VPN deals taking place right now.

    Livestream Spain vs. England in the US

    The Women’s World Cup final is being broadcast on Fox in the US. If you’re already a subscriber, you can livestream the game via the Fox website. if you’re not, you’ll need a live TV streaming service that carries Fox, the least expensive being Sling TV Blue.

    Numerous other live TV streaming services carry local Fox as well, namely YouTube TV, Hulu Plus Live TV, DirecTV Stream and FuboTV. They all cost more than Sling TV, but they also carry more channels. Check out our live TV streaming channel guide for details.

    NBC-owned Telemundo, meanwhile, offers coverage of the final in Spanish, which can also be viewed via NBC’s streaming platform Peacock Premium.

    One further option in the US for watching the match comes from Tubi TV, which is offering a full-length replay of the game in English, minutes it ends on the free ad-supported streaming service. You’ll have to sign up for a Tubi account in order to get the game, but you won’t need a credit card or subscription.

    Watch Spain vs. England for free in the UK

    Football fans in the UK are among the luckiest in the world, as the FIFA Women’s World Cup final is being shown live on two free-to-air channels, with BBC1 and ITV1 sharing broadcast duties. This means viewers in the region will be able to stream the game for free on BBC iPlayer as well as ITVX. Coverage starts at 10 a.m. BST on BBC One and at 10:15 a.m. BST on ITV1 on Sunday morning.

    Stream Spain vs. England for free in Australia

    Stream Spain vs. England in Canada

    Comprehensive live coverage of the 2023 Women’s World Cup final will be available in Canada via TSN. Cord cutters can watch via the network’s streaming service TSN Plus.

    Stream Spain vs. England for free in New Zealand

    Live coverage of 2023 Women’s World Cup for the co-host nation is with free-to-air channel Prime. Kick-off for the final is at 10 p.m. NZST.

    Quick tips for streaming the 2023 Women’s World Cup final using a VPN

    • With four variables at play — your ISP, browser, video streaming provider and VPN — your experience and success when streaming the Women’s World Cup final live may vary.
    • If you don’t see your desired location as a default option for ExpressVPN, try using the “search for city or country” option.
    • If you’re having trouble getting the game after you’ve turned on your VPN and set it to the correct viewing area, there are two things you can try for a quick fix. First, log into your streaming service subscription account and make sure the address registered for the account is an address in the correct viewing area. If not, you may need to change the physical address on file with your account. Second, some smart TVs — like Roku — don’t have VPN apps you can install directly on the device itself. Instead, you’ll have to install the VPN on your router or the mobile hotspot you’re using (like your phone) so that any device on its Wi-Fi network now appears in the correct viewing location.
    • All of the VPN providers we recommend have helpful instructions on their main site for quickly installing the VPN on your router. In some cases with smart TV services, after you install a cable network’s sports app, you’ll be asked to verify a numeric code or click a link sent to your email address on file for your smart TV. This is where having a VPN on your router will also help, since both devices will appear to be in the correct location.
    • And remember, browsers can often give away a location despite using a VPN, so be sure you’re using a privacy-first browser to log into your services. We normally recommend Brave.
  • Travel More With a Pair of Dollar Flight Club Memberships for $100

    If you’re tired of high airfare prices decimating your travel budget, you won’t want to miss this deal. There are a number of ways to cash in on cheaper flights without having to put in the time and effort to research the best deals yourself. Investing in a Dollar Flight Club subscription can help save you hundreds of dollars in airfare — plus the company does the work for you, sending email alerts for low fares directly to your inbox so you aren’t stuck comparing prices and hunting for bargains. And right now you can nab two memberships at a big discount.

    Get two lifetime Dollar Flight Club Premium Plus memberships at StackSocial for just $100 — this offer will knock hundreds off the price when compared with the $14-a-month subscription. This was already a pretty fine bargain when it included only one membership for this price, so getting two, which of course brings the cost to $50 each, is definitely an opportunity. We don’t know how long this offer will last, so we recommend making your purchase sooner rather than later if you don’t want to miss this deal.

    It’s hard to catch a break these days. Between many of us staying busy and living on a budget, saving both time and money is important. Instead of having to hunt down the best fares yourself, Dollar Flight Club will do it for you, making it much easier to book your dream vacation, prepare for a visit to see loved ones or find an excuse to take off for a last-minute weekend getaway.

    The Dollar Flight Club Premium Plus plan gives you access to savings on flights in business, premium economy and economy seating, and includes both domestic and international deals. Once you sign up and add your home airports, you’ll get instant alerts via email and can book whenever and wherever using the web or the app, which is available for iOS and Android devices.

    Plus, you can get perks and discounts of up to 50% off from various partners, including Babbel, Acanela Expeditions and Huckberry, as well as access to a variety of travel tips from DFC experts to help you plan your next adventure.

    If high flight prices have been stopping you from booking the vacation of your dreams, now’s a great time to invest in a service that can help you find the best discounts, curated and delivered directly to you. Again, there’s no set expiration for this offer, so we’d recommend getting your order in sooner rather than later if you don’t want to miss out on these savings.

    Read more: Best Luggage Deals