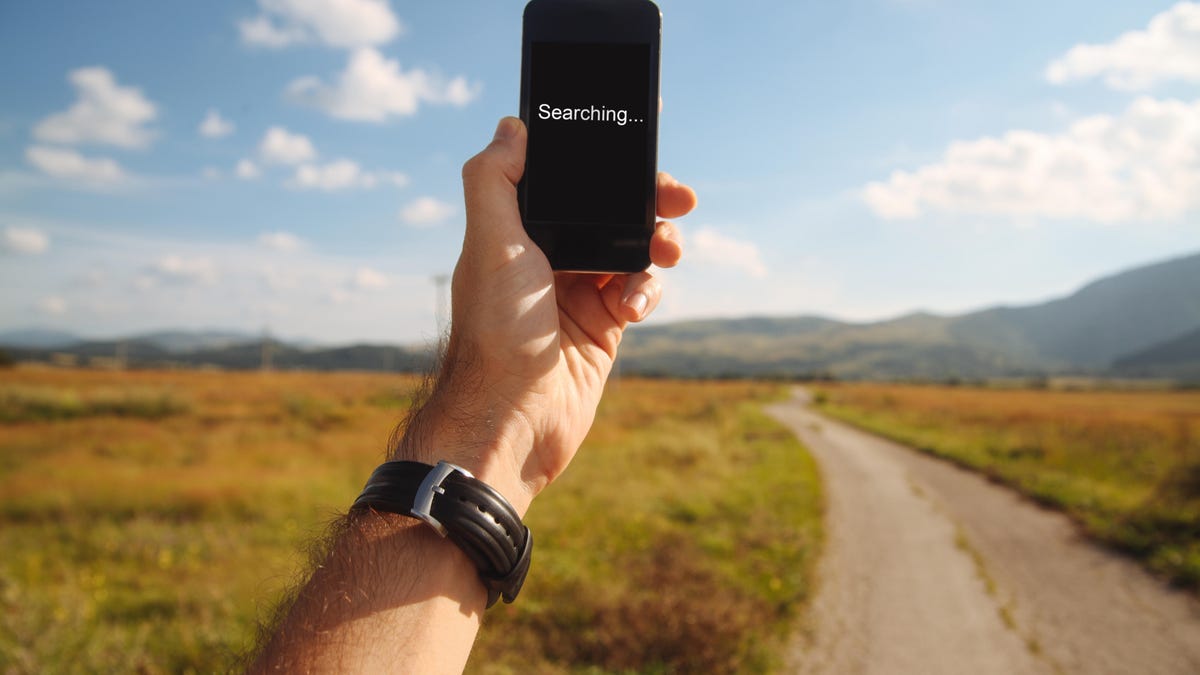
We live in a connected world, where losing your cellphone signal doesn’t just mean you can’t check Instagram — it could be a matter of life and death. It doesn’t matter which type of phone you use or even which cellular service provider you have, it’s inevitable that you’ll run into service disruptions, either from bad weather or remote areas that can weaken your phone signal.
Travel is going to be ramping up soon for the winter holidays, and losing your cellphone signal can get you into a real jam. If you want to avoid losing signal when navigating, dropping important calls with friends and family or even missing crucial travel updates and advisories this holiday season, there are several tips and tricks you can use to improve your cellphone signal.
The tried-and-true approach of turning on Airplane mode, waiting a few seconds, and then turning it off again can definitely help with reception. But when that doesn’t work, you might need to take more drastic steps, like removing your SIM card or resetting your network settings.
Before you dive into your phone’s settings, take a few minutes to perform some basic troubleshooting steps that could get your phone working at peak performance.
Note: Although software across different iPhone models is relatively the same, Samsung Galaxy, Google Pixel and other Android devices may have different software versions, and so certain settings and where they are located might differ from device to device.
To improve your cellphone service, try these steps first
The settings on your phone can help you get better cell service, but there are other tricks for improving your reception without even touching your phone’s software.
-
Move yourself so that there are no obstructions between your phone and any cell towers outside. That might involve stepping away from metal objects or concrete walls, which both kill reception. Instead, get to a window or go outside if possible.
-
Remove your phone case. It doesn’t hurt to remove whatever case you have on your phone, especially if it’s thick, so that the phone’s antenna isn’t blocked by anything and can get a better signal.
-
Make sure your phone is charged. Searching for and connecting to a stronger signal drains power, so if your phone battery is already low on charge, you may have a difficult time getting good service.
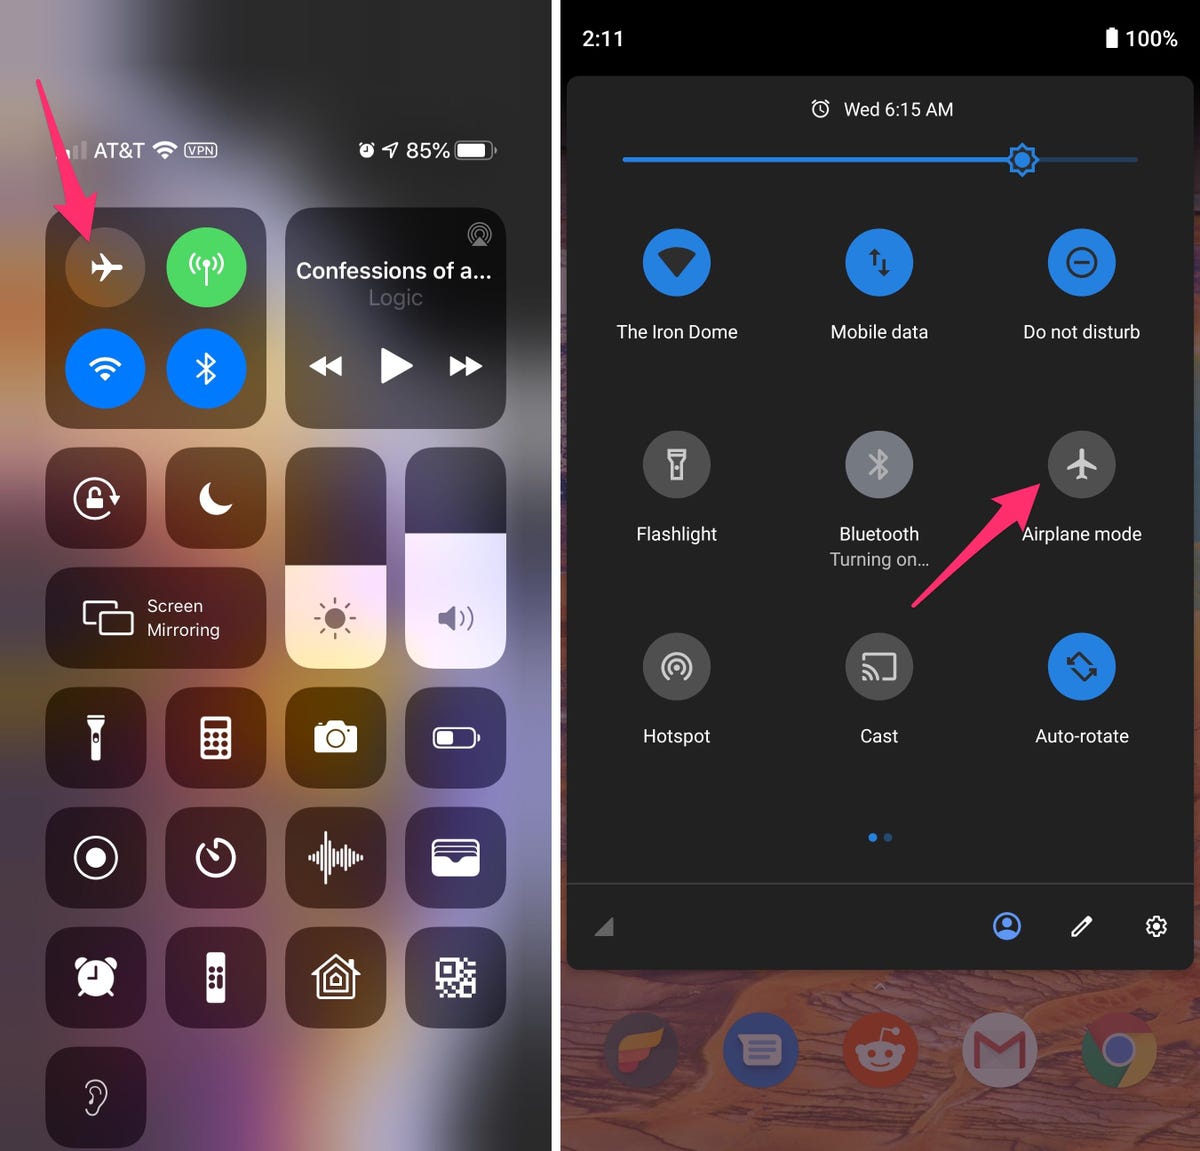
Always start by turning Airplane mode on and off
Turning your phone’s connection off and then back on is the quickest and easiest way to try and fix your signal woes. If you’re moving around from one location to another, toggling Airplane mode restarts the Wi-Fi, Bluetooth and cellular network modems, which forces them to find the best signal in the area.
Android: Swipe down from the top of your screen — to access the Quick Settings panel — and then tap the Airplane mode icon. Wait for your phone to completely disconnect from its Wi-Fi and cellular connections. It doesn’t happen instantly, so give it a good 15 seconds before you tap on the Airplane mode icon again.
iPhone: On the iPhone, you can access Airplane mode from the Control Center, but that varies depending on which iPhone model you have. On the iPhone X and later, swipe down from the top-right corner to access the Control Center. On older iPhone models, swipe up from the bottom of the screen. Then tap the Airplane mode icon, which will turn orange when it’s enabled. Again, wait up to 15 seconds before turning it off.
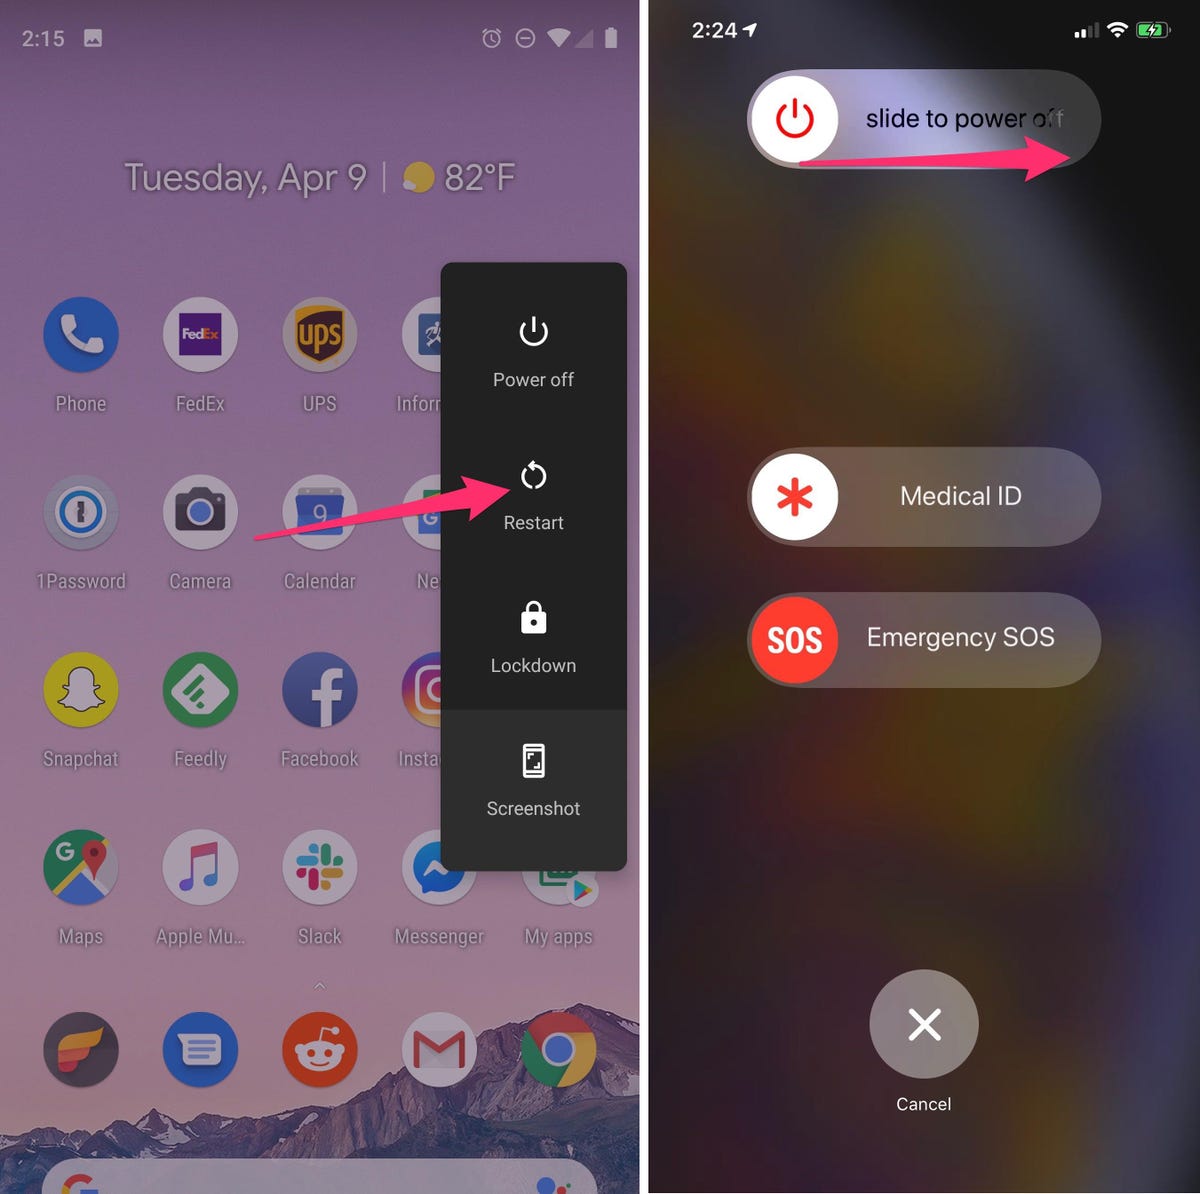
If airplane mode doesn’t work, restart your phone
Our phones are miniature computers, and just like computers, sometimes you can fix issues like network connection by simply restarting them.
Android: Hold down the power button, or the power button and the volume down key (depending on your Android phone), until the on-screen menu shows up, and then tap Restart. If your phone doesn’t offer a restart option, you can simply tap Power Off to shut down your device, and then boot it back up with the power button.
iPhone: On the iPhone X and older models, hold down the sleep/wake button and either one of the volume buttons and then swipe right on the power slider to turn off the device. Wait until it fully turns off, then press down on the sleep/wake button to turn it back on.
Alternatively, you can do a force reset on your iPhone: Press the volume up button, followed by the volume down button and then press and hold the side button. Keep holding it in, after your phone’s screen goes black and until you see the Apple logo appear again.
If your iPhone has a home button, hold down the sleep/wake button until the power slider is displayed and then drag the slider to the right. Once the device is turned off, press and hold the sleep/wake button until you see the Apple logo.
Take your SIM card out of your phone
Another troubleshooting step that might help is to remove your SIM card and then place it back in your phone with the phone turned on. If the SIM card is dirty, clean it. If it has any physical defects, you may need to replace it.
You’ll need a SIM card tool — usually included in your phone’s box — or an unfolded paper clip or sewing needle to get the SIM tray out of your phone.
All phones: Remove the SIM card, check to see if it’s damaged and positioned in the SIM tray correctly, then put it back in your phone.
eSIM: For phones with an eSIM — that is, an embedded electronic SIM in your phone — there’s nothing for you to remove. The best you can do is restart your phone.
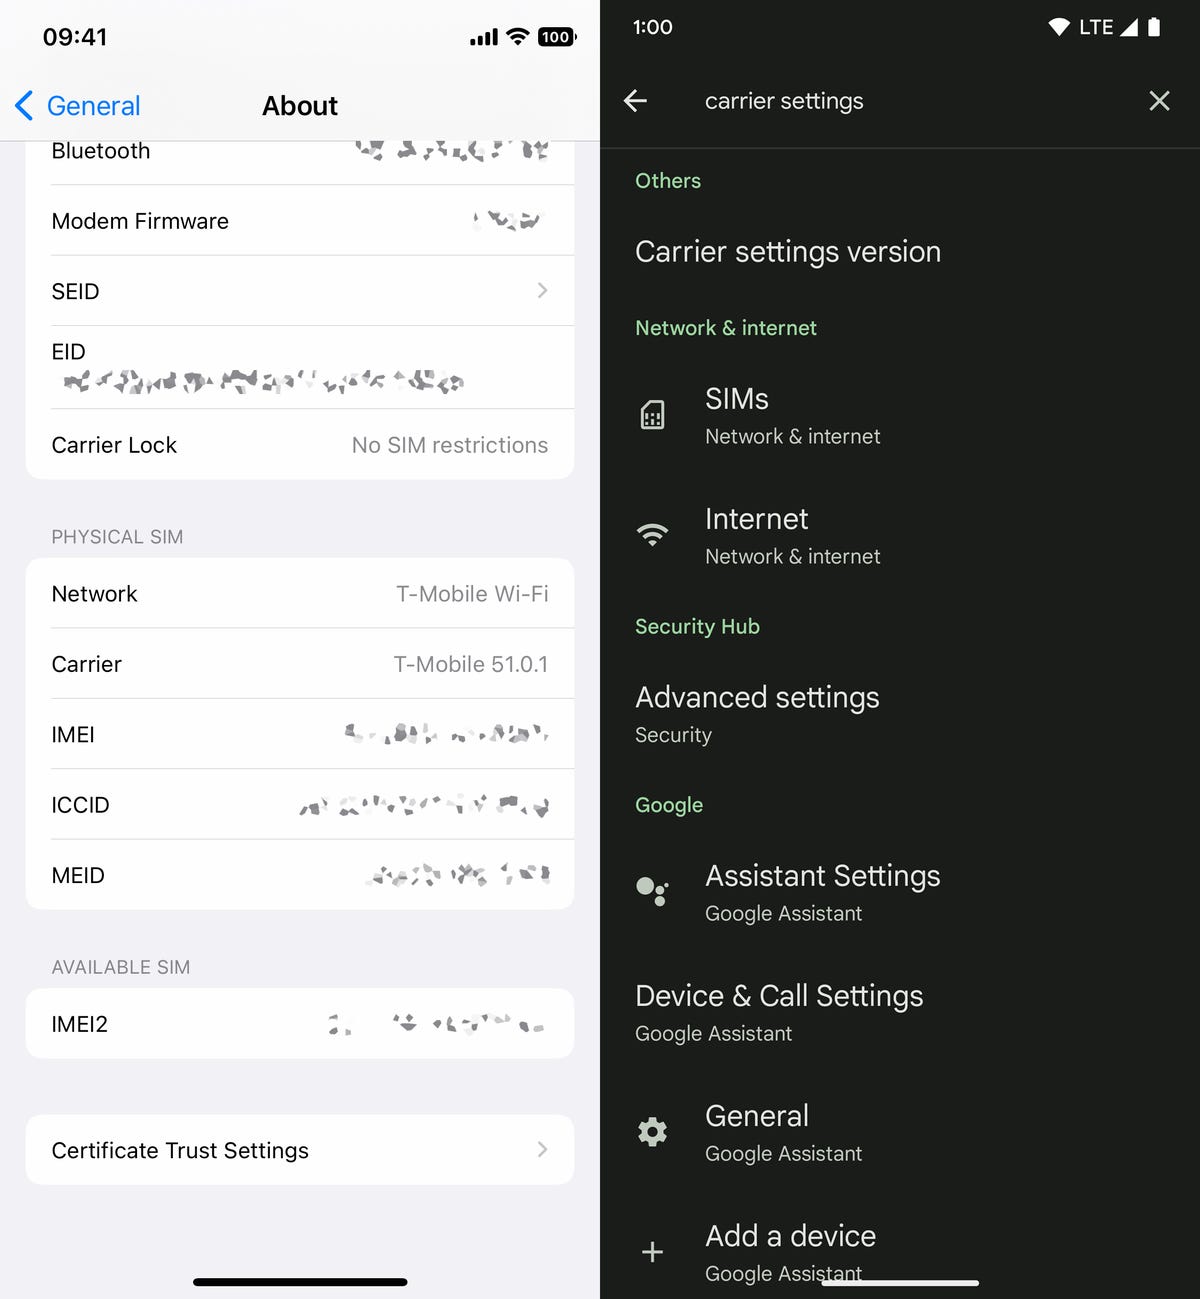
Check your carrier settings (and update your software)
Mobile carriers frequently send out carrier settings updates to help improve connectivity for calls, data and messages on their network. Although this feature is available on all iPhone models, it’s not universal on Android, so you might not find carrier settings if you don’t have a supported phone.
iPhone: Carrier updates should just appear, and you can update from the pop-up message that appears. To force your iPhone to check for a carrier settings update, go to Settings > General > About on your phone. If an update is available, you’ll be prompted to install it.
Android: As mentioned before, not all Android phones have carrier settings, so you’ll have to open the Settings app and type in “carrier settings” to find any possible updates. On supported Pixels, go to Settings > Network & internet > Internet, tap the gear next to your carrier name and then tap Carrier settings versions.
Reset your phone’s network settings
Sometimes all you need is a clean slate to fix an annoying connectivity issue. Refreshing your phone’s network settings is one way to do that. But be forewarned, resetting your network settings will also reset any saved Wi-Fi passwords, VPN connections and custom APN settings for those on carriers that require additional setup.
Android: In the Settings app, search for “reset” or more specifically “reset network settings” and tap on the setting. On the Pixel 6 Pro running Android 13, the setting is called Reset Wi-Fi, mobile & Bluetooth. After you reset your network settings, remember to reconnect your phone to your home and work Wi-Fi networks.
iPhone: Go to Settings > Transfer or Reset iPhone > Reset > Reset Network settings. The next page will warn you that resetting your network settings will reset your settings for Wi-Fi, mobile data and Bluetooth. Tap Reset Network Settings and your phone will restart.
Contact your phone carrier
Sometimes unexpected signal issues can be traced back to problems with your wireless carrier. A cell tower could be down, or the tower’s fiber optic cable could have been cut, causing an outage.
For consistent problems connecting to or staying connected to a cellular or data network, it’s possible your carrier’s coverage doesn’t extend well into your neighborhood. To help, some carriers will offer a network extender — a device that acts as a small wireless tower that relies on your internet connection, such as AT&T’s MicroCell or T-Mobile’s Personal CellSpot.
Other times, a newfound signal issue can be due to a defect with your phone or a SIM card that’s gone bad. Contacting your carrier to begin troubleshooting after you’ve tried these fixes is the next best step to resolving your spotty signal.
If all else fails, try a signal booster to improve cell reception
If after going through all of our troubleshooting steps, including talking to your carrier to go over your options, you’re still struggling to keep a good signal — try a booster. A signal booster receives the same cellular signal your carrier uses, then amplifies it just enough to provide coverage in a room or your entire house.
The big downside here is the cost. Wilson has three different boosters designed for home use, ranging in price from $349 for single room coverage to $999 to cover your entire home. To be clear, we haven’t specifically tested these models. Wilson offers a 30-day money back guarantee and a two-year warranty should you have any trouble with its products.
With your signal issues resolved, using your phone as a mobile hotspot for a backup connection is easy, but there are some things you need to know. If you’re looking for iPhone-specific tips and tricks, check out our guide to hidden features on iOS 16. And for Android fans, we have some hidden features for Android 12 as well.