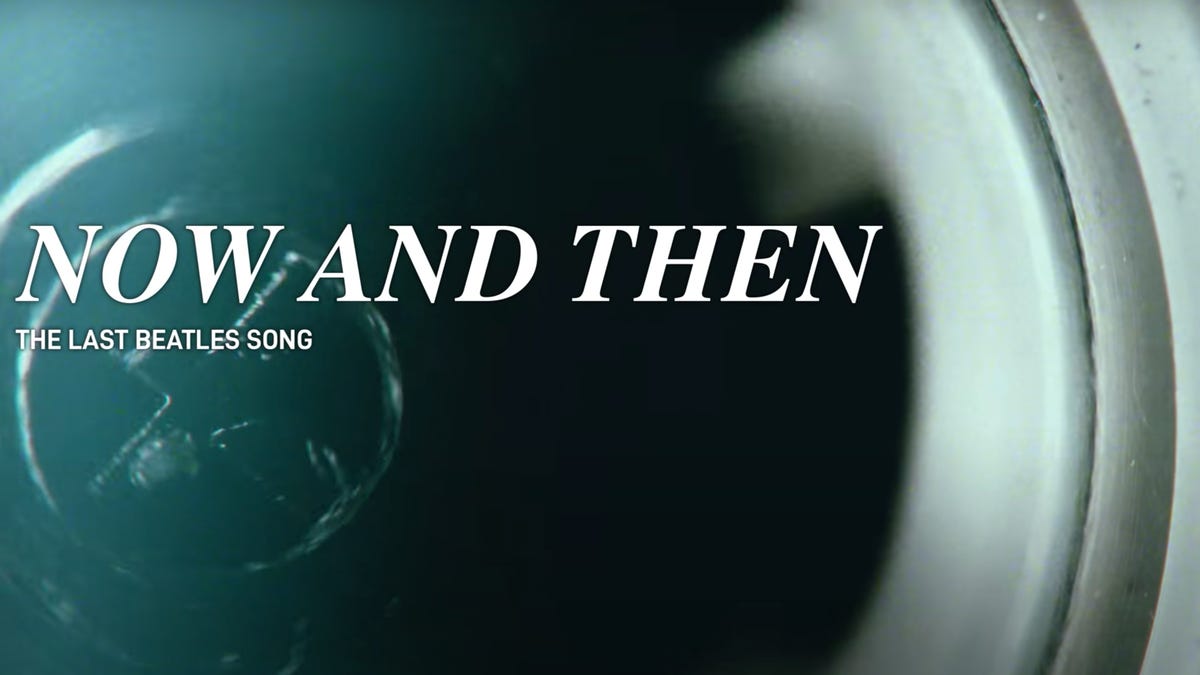
Category: Technologies

  • Amazon’s New Fire TV Soundbar Sees First Discount to Just $100

    Amazon’s New Fire TV Soundbar Sees First Discount to Just $100

    Sure, you can watch TV shows and movies using just your TV’s built-in speakers, but it’s far from the best way to do it. The humble soundbar is a much better way to get audio from your home entertainment gear and into your ears — and the Amazon Fire TV Soundbar is an excellent, low-cost example.

    That Amazon Fire TV Soundbar would normally set you back around $120, which is already cheaper than a lot of the competition. Right now, Amazon has it on sale for a new all-time low price, a cent less than $100. Just place your order soon — we don’t know how long this deal is going to last.

    The Fire TV Soundbar is compact at just 24 inches wide and it’s designed to work best with Fire TV streaming devices and smart TVs, as you’d expect, though you can use it with other smart TVs and media players. When it comes to actually getting audio into this thing you’ll benefit from Bluetooth, HDMI eARC and digital optical as well. There’s support for DTS Virtual:X built in, and all of that for just $100 if you act now.

    Like all the best soundbars, this one doesn’t try to capture the attention below your TV and is nice and simple. It only comes in one, understated color but it can be wall-mounted if that’s something you want to do to match your room’s aesthetic.

  • Thursday Night Football: How to Watch, Stream Titans vs. Steelers Tonight on Prime Video or Twitch

    Thursday Night Football: How to Watch, Stream Titans vs. Steelers Tonight on Prime Video or Twitch

    The Will Levis Show moves to prime time. The Titans’ rookie quarterback was impressive in his first NFL start last week, leading the team to a win and tossing four touchdowns in the process. Levis faces a tough task tonight, going up against T.J. Watt and the stout Steelers defense in Pittsburgh. The Steelers will also have defensive tackle Cameron Heyward back in the lineup. A team captain and key piece in the middle of Pittsburgh’s defensive line, Heyward has been out since being injured in week 1.

    Kickoff for the Titans-Steelers game on Thursday Night Football is set for 8:15 p.m. ET (5:15 p.m. PT) tonight with the game streaming nationally on Prime Video and for free on Twitch.

    Tennessee Titans quarterback Will Levis in a throwback Houston Oilers uniform

    Keep reading to see your options for watching Thursday Night Football on Prime Video, Twitch, NFL Plus and — if you live in the home markets of the Titans or Steelers — a local network channel.

    With YouTube and YouTube TV now the exclusive home of NFL Sunday Ticket, along with games also streaming on Paramount Plus, Peacock and ESPN Plus, there’s lots for NFL fans to keep track of this season. Check out our picks for the best live TV streaming services for NFL fans in 2023.

    TNF streaming: Prime Video, Twitch and NFL Plus

    Thursday Night Football games are streamed nationally on Amazon Prime Video, giving NFL fans more incentive than free two-day shipping to sign up for an Amazon Prime account, which costs $15 a month or $139 a year. You can also subscribe only to Prime Video for $9 a month.

    Fans in the local market of each team playing on Thursday night will be able to watch on an over-the-air station, while those who don’t pay for either of Amazon’s services can watch for free on Prime Video’s Twitch channel. (Twitch is also owned by Amazon.)

    If you subscribe to NFL Plus, the league’s $7-per-month streaming service (or $15 a month with Red Zone included), you can also stream the game without subscribing to Prime or Prime Video. Note that NFL Plus viewing is limited to watching on just a phone or tablet, not on a computer or TV.

    Can I watch Thursday Night Football on local TV?

    Yes, you can, if you live in the local market of either of the teams playing on Thursday. For this week, that’s WTVF CBS 5 in Nashville and WPXI NBC 11 in Pittsburgh. There are two ways to watch local channels on your TV. The first is with a live TV streaming service. And the second is with an over-the-air antenna, if you live in an area that has good reception.

    Four of the five of the live TV streaming services carry CBS and NBC, but not every service carries every local network, so check each one using the links below to make sure it carries CBS and NBC in your particular area.

    All the live TV streaming services above offer free trials, allow you to cancel anytime and require a solid internet connection. Looking for more information? Check out our live TV streaming services guide.

  • My Favorite Moment Photography Gear Is Up to 50% Off Ahead of Black Friday

    My Favorite Moment Photography Gear Is Up to 50% Off Ahead of Black Friday

    With Black Friday just around the corner, photography specialist Moment is taking as much as 50% off its phone lenses, mounts, backpacks and other accessories.

    I’ve been using Moment camera lenses on my iPhone since 2021. My iPhone 12 didn’t have a dedicated telephoto camera, so I added a lens over the primary camera in the form of the M-Series tele lens. While there’s a new Moment T-series 58mm lens, its predecessor is on sale, alongside plenty of other gear that I’ve used and loved. Here are some of my favorite Moment products that I think you should definitely try.

    These are some of my favorite Moment products that you should definitely take a look at if you’re a keen photographer. The lenses will definitely give you more perspectives while shooting.

  • Best Buy Knocks $50 Off (Almost) All Galaxy Watch 6 Configurations

    Best Buy Knocks $50 Off (Almost) All Galaxy Watch 6 Configurations

    For Android users, Samsung’s latest Galaxy Watch 6 and 6 Classic are our overall favorite smartwatches on the market right now. Deals have been pretty slim since they first hit shelves this summer, but right now, you can save $50 on nearly all configurations at Best Buy. That drops the starting price down to just $250. These deals are only available today. They expire at 9:59 p.m. PT (12:59 a.m. ET), so be sure to get your order in before then if you don’t want to miss out on these savings.

    The new Galaxy Watch 6 lineup comes equipped with 2GB of RAM, 16GB of built-in storage and is powered by Samsung’s latest WearOS 4. These updated Samsung smartwatches also feature a rugged design with IP68 weather resistance, and are waterproof up to 50 meters. They’re also equipped with solid fitness tracking capabilities, and allow you to monitor your speed, distance, heart rate, sleep patterns and more, and can even give you a breakdown of your BMI, skeletal muscle, body water and more right from your wrist.

    There are quite a few different configurations to choose from. Prices start at $250, which scores you the basic 40mm Galaxy Watch 6, and you can upgrade to the larger 44mm display for $280. The Galaxy Watch 6 Classic has a more heavy-duty stainless steel frame and a rotating bezel, and starts at $350 for the 43mm model and $380 for the 47mm model. If you want cellular connectivity, prices jump up by $50 for the basic Galaxy Watch 6 and $70 for the Galaxy Watch 6 Classic (which are only discounted by $30). It’s also worth noting that you’ll find select configurations discounted at Amazon right now as well, but most are only around $30 off.

  • Passkeys Have Come to Amazon. Here’s What You Need to Know

    Passkeys Have Come to Amazon. Here’s What You Need to Know

    Last week, Amazon announced that it would be hopping on the Passkey train. This means that you’ll now be able to use passkeys to log in to some of your Amazon accounts (we’ll get to which ones later). The tech giant joins a slew of other companies who are saying goodbye to passwords and opting for passkeys instead.

    Switching to passkeys isn’t mandatory for Amazon customers, the shopping giant said, so if you’re not ready to make the switch, you can keep using your passwords. But if you’re interested in ditching your passwords for good, you can go ahead and set up your Amazon passkey right now.

    Here’s what to know about Amazon’s adoption of the password alternative. For more, here’s how Apple’s adopting passkeys and what Google is doing to ditch passwords.

    What is a passkey?

    Passkeys are a new, secure and easier way to log in to a service or website using biometric authentication like a fingerprint or face scan (or other methods, like a PIN) instead of a password. You might already have a bit of experience with passkeys. For example, if you have Face ID set up on your iPhone, some apps allow you to to use Face ID to sign in instead of typing your account password.

    According to backers of passkeys, it’s a more secure method of logging into your accounts than with traditional passwords and is much less susceptible to phishing attacks. Passkeys can be more convenient than keeping track of all of your passwords, let you log in usually with just a click instead of several taps and eliminate the need for two-factor authentication codes, which can clog up your inbox or messages app.

    Who else is implementing passkeys?

    Amazon is the latest in a string of tech companies that have either axed passwords or given customers the option to use a passkey instead of a password. In adopting passkeys, the online retailer joins the likes of Google, Nintendo and Apple in passwordless support.

    Which Amazon services work with passkeys now?

    Right now, Amazon has only rolled out passkeys to its primary retail website.

    In a response to CNET’s request for comment on where users could take advantage of passkeys, Amazon said “Passkey support is available globally today for all Amazon customers using browsers.” The company indicated that more support would be rolling out to the iOS Amazon Shopping app and that the Android Amazon Shopping app would be receiving passkey support in the near future.

    The company also said that it “will be adding passkeys to more apps in the future,” so users of Amazon-owned companies like Goodreads and Twitch could expect to see passkey support at some point in their future, too.

    How to set up a passkey on your Amazon account

    If you’re interested in ditching your password and opting to use a passkey for your Amazon account, it’s easy to set up. Again, passkeys aren’t mandatory for Amazon customers, so if you feel more comfortable using your password, you won’t have to worry about changing over right away.

    To set up a passkey, all you have to do is go to your Account page and select Login & Security.

    Once in the Login & Security menu, scroll down to the Passkeys tab and select the Set Up button.

    This should bring you to another screen, where you will select Set Up again.

    After selecting Set Up a second time, follow the onscreen instructions that are specific to your device or browser to set up your passkey.

    After completing these steps, you can say goodbye to your passwords and use your passkey to log in to your Amazon account.

    For more, here’s how to use passkeys to login to your Google account and the best password manager for 2023.

  • Sonoma Finally Equalizes Your Mac Up and Your iPhone

    Sonoma Finally Equalizes Your Mac Up and Your iPhone

    It’s been a busy fall for Apple. The company has introduced a slew of new features and products this fall, from a flurry of Apple hardware and software upgrades to brand-new Apple Watches, iPhones, Apple Pencils and new editions of all of Apple’s flagship softwares. Most recently, the tech giant unveiled it’s brand-new M3 chip, the new 14-inch and 16-inch MacBook Pros, and a refreshed version of the iMac at it’s “Scary Fast” Event held earlier this week.

    Even though MacOS Sonoma’s smaller updates didn’t get the pomp and circumstance that they deserved earlier this year, several brand-new Macs hitting the scene this fall will be sure to shake things up. So if you’re looking to upgrade your Mac and your iPhone in one fell swoop this year, you’re gonna want them to work together seamlessly.

    Luckily for those who plan on upgrading both their computer and their phone, MacOS Sonoma’s update brings features that iPhone users have enjoyed for several years and some brand-new ones that iPhone users first saw in iOS 17.

    Check out these new Mac features that I think make my phone and computer work better together. For more, check out how to fix the most annoying iOS 17 features and the Mac keyboard shortcuts you need to know.

    Widgets come to your desktop

    Mac OS Sonoma desktop with widgets

    While widgets aren’t an earth-shattering productivity feature, or even new to Apple fans, having them on your desktop is pretty helpful. For instance, some of my co-workers work on the west coast, while I work on the east coast, so I have a clock widget that displays what the current time is in Pacific Standard Time that makes coordinating with my coworkers a bit simpler.

    The widgets are also super simple to use — all you have to do is right-click with your mouse or double-click your trackpad on your desktop and a menu will pop out. You can select Edit Widgets and a widget menu will appear where you can select small, medium or large widgets for a variety of applications. If you want to remove a widget, you can either right-click or use two fingers to click your trackpad and select Remove Widget, or you can click the small red button that appears after selecting Edit Widget to remove your widget.

    mac os sonoma's widget menu

    You can also drag and drop widgets from your Notification Center to your desktop. If you want to add widgets to your notification center, all you need to do is scroll to the bottom of your notification center and click Edit Widgets. You remove widgets from your notification center in the same way you would from your desktop.

    You can also add your iPhone widgets to your Mac’s desktop, even if you don’t have the widget’s corresponding app downloaded to your computer. To enable this, you will need to go to System Settings, then scroll down to Desktop and Dock and from there scroll to the Widgets section. Once in the widgets section, simply toggle the Use iPhone Widgets option on. Your iPhone widgets will be available from the widget browser that appears when selecting Edit Widget on your desktop or notification center.

    Auto-sorting grocery lists

    I’m a pretty organized person, but to be honest, I’ve never turned to Apple’s Reminders app for help with this. The app didn’t make much sense to me and I traditionally have opted for third-party organization apps. While these new reminders features aren’t enough to sway me away from my preferred organization apps, there are some additions that have gotten me to make use of the app.

    reminders screen and grocery list from mac os sonoma

    The changes to reminders are pretty easy to take advantage of. The most major update is the auto-sorting grocery list feature. To make use of this feature, click the Add List button at the bottom of the reminders page. Give your list a name (and change the color of the list and the icon if you’d like). Then, under the List Type drop-down menu, select Groceries.

    Once in the list, create the categories you want for your list. For example, my list had three categories: meats, produce and miscellaneous. After you create your categories, you should be able to start putting your list together, and the items you add should be automatically sorted. Be warned — this feature seems to be a bit buggy. My best advice is to keep trying the feature, and you can always drag and drop your items to their correct category if nothing else works.

    Messages that mirror your phone

    One of my favorite things about having an Apple family of products is that I can text from my computer. This sounds small, but this has proven super-helpful in my day-to-day life. When I’m working on my computer, I can put my phone completely away so I can focus, but it’s nice to still be able to be reached.

    One thing that has always frustrated me about iMessage on my computer is that it feels years behind my phone. For the longest time, I couldn’t use tap-back reactions or even reply to messages like I could when I would text on my phone. Sonoma has changed this for the better — there is finally parity between phone and computer when it comes to the messages experience.

    screen shot of Mac OS Sonoma's reply function in the messages app

    The biggest feature that I had been missing was the reply function. Essentially, this function allows you to swipe across on a message and reply directly to that specific message. I’ve found this feature particularly helpful when making complicated plans or in noisy group chats.

    All you have to do to use the reply function is swipe two fingers to the right until you can reply to the message. If you don’t want to swipe, you can click the message you wish to reply to with two fingers and select Reply from the drop-down menu.

    For more, here’s the best MacBook of 2023.

  • Dealing with Bad Cellphone Reception? Check Out These 10 Ways You Can Boost Your Cellphone Signal

    Dealing with Bad Cellphone Reception? Check Out These 10 Ways You Can Boost Your Cellphone Signal

    There’s no denying that we live in a constantly connected world, where losing your cellphone signal doesn’t just mean you can’t check Twitter and Instagram — it could be a matter of life and death. It doesn’t matter what type of phone you use or even which cellular service provider you have, you’re bound to run into service disruptions, either from bad weather or remote areas that might weaken your phone signal.

    As travel is ramping up for the winter holidays, losing your cellphone signal can get you into a real jam. If you want to avoid getting lost or missing important calls this holiday season, there are several tips and tricks you can use to improve your cellphone signal.

    The tried-and-true approach of turning on Airplane mode, waiting a few seconds, and then turning it off again can definitely help with reception. But when that doesn’t work, you might need to take more drastic steps, like removing your SIM card or resetting your network settings.

    Before you dive into your phone’s settings, take a few minutes to perform some basic troubleshooting steps that could get your phone working at peak performance.

    Note: Although software across different iPhone models is relatively the same, Samsung Galaxy, Google Pixel and other Android devices may have different software versions, and so certain settings and where they are located might differ from device to device.

    To improve your cellphone service, try these steps first

    The settings on your phone can help you get better cell service, but there are other tricks for improving your reception without even touching your phone’s software.

    • Move yourself so that there are no obstructions between your phone and any cell towers outside. That might involve stepping away from metal objects or concrete walls, which both kill reception. Instead, get to a window or go outside if possible.
    • Remove your phone case. It doesn’t hurt to remove whatever case you have on your phone, especially if it’s thick, so that the phone’s antenna isn’t blocked by anything and can get a better signal.
    • Make sure your phone is charged. Searching for and connecting to a stronger signal drains power, so if your phone battery is already low on charge, you may have a difficult time getting good service.
    Moshi iPhone 13 cases

    Always start by turning Airplane mode on and off

    Turning your phone’s connection off and then back on is the quickest and easiest way to try and fix your signal woes. If you’re moving around from one location to another, toggling Airplane mode restarts the Wi-Fi, Bluetooth and cellular network modems, which forces them to find the best signal in the area.

    Android: Swipe down from the top of your screen — to access the Quick Settings panel — and then tap the Airplane mode icon. Wait for your phone to completely disconnect from its Wi-Fi and cellular connections. It doesn’t happen instantly, so give it a good 15 seconds before you tap on the Airplane mode icon again.

    iPhone: On the iPhone, you can access Airplane mode from the Control Center, but that varies depending on which iPhone model you have. On the iPhone X and later, swipe down from the top-right corner to access the Control Center. On older iPhone models, swipe up from the bottom of the screen. Then tap the Airplane mode icon, which will turn orange when it’s enabled. Again, wait up to 15 seconds before turning it off.

    airplane-mode-android-iphone

    If airplane mode doesn’t work, restart your phone

    Our phones are miniature computers, and just like computers, sometimes you can fix issues like network connection by simply restarting them.

    Android: Hold down the power button, or the power button and the volume down key (depending on your Android phone), until the on-screen menu shows up, and then tap Restart. If your phone doesn’t offer a restart option, you can simply tap Power Off to shut down your device, and then boot it back up with the power button.

    iPhone: On the iPhone X and older models, hold down the sleep/wake button and either one of the volume buttons and then swipe right on the power slider to turn off the device. Wait until it fully turns off, then press down on the sleep/wake button to turn it back on.

    Alternatively, you can do a force reset on your iPhone: Press the volume up button, followed by the volume down button and then press and hold the side button. Keep holding it in, after your phone’s screen goes black and until you see the Apple logo appear again.

    If your iPhone has a home button, hold down the sleep/wake button until the power slider is displayed and then drag the slider to the right. Once the device is turned off, press and hold the sleep/wake button until you see the Apple logo.

    restart-android-iphone

    Take your SIM card out of your phone

    Another troubleshooting step that might help is to remove your SIM card and then place it back in your phone with the phone turned on. If the SIM card is dirty, clean it. If it has any physical defects, you may need to replace it.

    You’ll need a SIM card tool — usually included in your phone’s box — or an unfolded paper clip or sewing needle to get the SIM tray out of your phone.

    All phones: Remove the SIM card, check to see if it’s damaged and positioned in the SIM tray correctly, then put it back in your phone.

    eSIM: For phones with an eSIM — that is, an embedded electronic SIM in your phone — there’s nothing for you to remove. The best you can do is restart your phone.

    sim-pixel-3-xl

    Check your carrier settings (and update your software)

    Mobile carriers frequently send out carrier settings updates to help improve connectivity for calls, data and messages on their network. Although this feature is available on all iPhone models, it’s not universal on Android, so you might not find carrier settings if you don’t have a supported phone.

    iPhone: Carrier updates should just appear, and you can update from the pop-up message that appears. To force your iPhone to check for a carrier settings update, go to Settings > General > About on your phone. If an update is available, you’ll be prompted to install it.

    Android: As mentioned before, not all Android phones have carrier settings, so you’ll have to open the Settings app and type in “carrier settings” to find any possible updates. On supported Pixels, go to Settings > Network & internet > Internet, tap the gear next to your carrier name and then tap Carrier settings versions.

    Carrier settings on iOS and Android

    Reset your phone’s network settings

    Sometimes all you need is a clean slate to fix an annoying connectivity issue. Refreshing your phone’s network settings is one way to do that. But be forewarned, resetting your network settings will also reset any saved Wi-Fi passwords, VPN connections and custom APN settings for those on carriers that require additional setup.

    Android: In the Settings app, search for “reset” or more specifically “reset network settings” and tap on the setting. On the Pixel 6 Pro running Android 13, the setting is called Reset Wi-Fi, mobile & Bluetooth. After you reset your network settings, remember to reconnect your phone to your home and work Wi-Fi networks.

    iPhone: Go to Settings > Transfer or Reset iPhone > Reset > Reset Network settings. The next page will warn you that resetting your network settings will reset your settings for Wi-Fi, mobile data and Bluetooth. Tap Reset Network Settings and your phone will restart.

    Network settings on iOS and Android

    Contact your phone carrier

    Sometimes unexpected signal issues can be traced back to problems with your wireless carrier. A cell tower could be down, or the tower’s fiber optic cable could have been cut, causing an outage.

    For consistent problems connecting to or staying connected to a cellular or data network, it’s possible your carrier’s coverage doesn’t extend well into your neighborhood. To help, some carriers will offer a network extender — a device that acts as a small wireless tower that relies on your internet connection, such as AT&T’s MicroCell or T-Mobile’s Personal CellSpot.

    Other times, a newfound signal issue can be due to a defect with your phone or a SIM card that’s gone bad. Contacting your carrier to begin troubleshooting after you’ve tried these fixes is the next best step to resolving your spotty signal.

    galaxy-s10-plus-macro-1

    If all else fails, try a signal booster to improve cell reception

    If after going through all of our troubleshooting steps, including talking to your carrier to go over your options, you’re still struggling to keep a good signal — try a booster. A signal booster receives the same cellular signal your carrier uses, then amplifies it just enough to provide coverage in a room or your entire house.

    The big downside here is the cost. Wilson has three different boosters designed for home use, ranging in price from $349 for single room coverage to $999 to cover your entire home. To be clear, we haven’t specifically tested these models. Wilson offers a 30-day money back guarantee and a two-year warranty should you have any trouble with its products.

    With your signal issues resolved, using your phone as a mobile hotspot for a backup connection is easy, but there are some things you need to know. If you’re looking for iPhone-specific tips and tricks, check out our guide to hidden features on iOS 16. And for Android fans, we have some hidden features for Android 12 as well.

  • For Just $20 You Can Snag the HD Chromecast With Google TV

    For Just $20 You Can Snag the HD Chromecast With Google TV

    There are no shortage of streaming services to choose from these days — and an increasing number of shows and films have been released exclusively on those platforms, making it harder for streaming holdouts to access major hits. For those that have yet to invest in a media streamer, now is a great time to take the plunge.

    Right now Chromecast with Google TV HD — one of our picks for best streaming devices for 2023 — is back down to just $20, saving you 33% off its list price. We don’t know how long this offer will last, so we recommend getting your order in soon if you want to nab one for your place at this price.

    If you don’t yet have a 4K TV or stream your content in HD anyway, this entry-level streamer is a good bargain. You don’t have to worry about line-of-sight and the remote has a built-in button for instant access to Google Assistant — so you can quickly search with your voice. Simply plug it into the HDMI port on your TV, and once you’re connected to your Wi-Fi, this baby can stream all your favorite shows, movies and more.

    This Chromecast device shows everything from your streaming services in one place, so you won’t have to jump between apps to decide what to watch. Plus, you can manage your connected devices from your couch. And you can set parental controls if you have little ones at home. As long as you don’t need all the bells and whistles, this is a solid streaming option at a bargain price.

  • Woot’s LG OLED TV Deal Saves You Over $1,100

    Woot’s LG OLED TV Deal Saves You Over $1,100

    Even though the LG C3 has already been released, the LG C2 is still one of the best high-end TVsyou can get, according to CNET’s David Katzmaier. Featuring an OLED panel, the C2 offers brilliant color reproduction and visual fidelity compared to a traditional LED or QLED TVs. Even better, there’s a substantial deal at Woot that will discount the 65-inch model down to just $1,397, which is a significant 44% discount. An unlike a lot of Woot deals, this TV is offered brand new with a one-year manufacturer warranty.

    The TV itself is optimized for a true cinematic experience at home, as its a9 Gen 5 AI processor, 8 million self-lit pixels, 4K resolution, Dolby Vision IQ, Dolby Atmos and a Filmmaker Mode combine to give it “better picture quality than any non-OLED TV,” according to Katzmaier. And if you’re a gamer, this TV has Nvidia G-Sync, FreeSync Premium and a variable refresh rate of 120Hz so you can have lag-free gaming sessions — along with four HDMI 2.1 ports for your consoles or other devices. Katzmaier says these are “best-in-class gaming features.”

    There’s also built-in support for Amazon Alexa, Google Assistant, Apple AirPlay and more, which means you can use voice commands to control this set and connected devices. You can also get personalized recommendations for every member of your family by making separate accounts.

    However, if you don’t need an OLED TV, there are plenty of other cheap TV deals worth checking out.

  • Prusa Mk4 3D Printer Review: Plenty of Improvements in Search of Something Greater

    Prusa Mk4 3D Printer Review: Plenty of Improvements in Search of Something Greater

    For the better part of a decade, the Prusa Mk3 has been the best 3D printer you could buy for less than $1,000, and the Mk4 — the natural evolution of the MK3 — would have retained that top slot if the landscape hadn’t changed so much in the last year. Now, the MK4 is still a good machine, but is it a great one compared to the competition?

    Prusa Mk4 with a dragon bust and skeleton leg on the build plate

    If you have been into 3D printing at all in the past 10 years, you’re sure to recognize the shape and even the colors of the Prusa Mk4. Prusa Research has been making open-source printers for as long as I have been part of the 3D printing space, and the iconic black-and-orange bedslinger is synonymous with excellent print quality and a sense of community.

    The Mk4 has much the same shape and design as the Mk3 with a lot of refinement. The frame of the MK4 is thicker aluminum than the Mk3, adding stability, something that is needed when you’re accelerating at the speeds these machines now run at. The Mk4 also features a whole new extruder system, called the Nextruder, that uses a dual-gear system to control the flow of materials. This is especially helpful with TPU — the very flexible filament used in phone cases — as it forces the bendy material to behave while running through the nozzle. The nozzle is also swappable using a very easy, hand-tight screw mechanism. This lets you change nozzle sizes between prints, so you can use smaller nozzles for details and a larger nozzle for structural parts.

    Really, almost no part of the Mk3 still exists in a meaningful way on the MK4. It looks the same, but every part that can be upgraded has been. Although there’s an upgrade kit available to turn your Mk3S+ into a Mk4, you really shouldn’t bother; you’ll be spending as much and replacing almost all the parts anyway. Just buy the Mk4 and keep your Mk3 for other projects, or, even better, donate it to your local school.

    Prusa MK4

    Build Volume (mm) 210 x 250 x 220
    Hot end All metal
    Extruder type Direct Drive Nextruder
    Nozzle diameter mm 0.4 (0.2, 0.6, 0.8 compatable)
    Nozzle max temperature 290c
    Build plate max temperature 120c
    Official max speed 600mm/s
    Supported material PLA, PETG, ABS, ASA, Flex, HIPS, PVA
    Auto bed leveling Yes
    Filament Run out sensor Yes
    Connectivity USB memory card, WiFi and ethernet with Caveats
    Time-lapse camera No
    Slicer PrusaSlicer

    With all of the upgrades, you should expect the Prusa Mk4 to be significantly better than the Mk3 in terms of quality, and that’s difficult. The Mk3 always operated at peak quality for me, and whenever I needed something to print as smoothly as I could, I used the Mk3. The Mk4 offers that same level of quality without improving on it very much. What it does is maintain that extremely high standard while printing at least twice as fast.

    I’ve printed for nearly 100 hours so far, using PLA, ABS, TPU and PETG, and every print has completed extremely well, aside from some heavy stringing. Even my CNET test print had a lot of stringing across the peaks, something that doesn’t happen as much these days. Despite using PrusaSlicer — the slicer specifically designed for the Mk4 — I couldn’t get the stock profiles to print without stringing. Every profile needed the temperature turned down by 8 to 10 degrees Celcius.

    A skull that looks like it's made from crochet in a pink to purple transition

    The rest of the CNET test and every print I printed turned out very well. The details on this red dragon from Fotis Mint are exquisite, though even here, you can see some stringing. Both the overhang test and bridging test were almost perfect, even at the hardest levels, and the tolerance test — one of the hardest tests on the CNET model — showed all four parts to be easily removable. This is a rare thing, happening on only five of the dozens of 3D printers I have tested over the years.

    I’m impressed with the quality of the prints on the MK4, and I’m happy to see that even when you print at high speeds, it maintains the quality that we expect from Prusa Research. It’s also worth a special shout-out to the work PrusSlicer does to make sure these models are excellent. The organic support structures that PrusaSlicer uses are nothing short of miraculous and have all but eliminated the scarring that used to occur when printing with supports.

    A red dragon on the Mk4 build plate

    While speed isn’t everything, it’s incredibly important in this modern age. When most of the best 3D printers are now fast 3D printers, Prusa has to keep up with the changing times. They almost didn’t, releasing the MK4 without any speed bump at all over the Mk3. Thankfully, Prusa managed to get an update out within a few weeks, helping to keep it in the top 10 printers to buy. Just two years ago, you could have argued that speed only made the quality worse, and that’s why manufacturers didn’t focus on it, but with the X1 Carbon from Bambu Lab proving you could have both speed and quality, every manufacturer needs to focus on both areas to be successful.

    I would also love to see a more user-friendly setup for using a network on the MK4. While it has both Wi-Fi and an Ethernet port, both of them require another piece of software to run other than the slicer, making them complicated. Modern 3D printers should have easy access to remote printing, and possibly even an app. Prusa is well placed to be able to do that, as the company owns into only PrusaSlicer, one of the best slicers around, but printables.com, one of the best repositories for 3D models on the web. These resources should be brought together to make printing on the MK4 from anywhere a breeze. Unfortunately, it requires a mess of shenanigans to accomplish.

    A blue skull, a pink punk skull and green skull, all 3D printed on a table

    Prusa has kept its open-source roots with the Mk4, something that we can all appreciate. The greatest achievement of the Mk2/Mk3/Mk4 series has been the ability to expand, upgrade and tinker with them without fear, as long you follow the open-source rules. This has given birth to some amazing projects, college papers and life-saving techniques, and I think that open-source printers will always have a place in our community. Prusa is one of the last bastions of truly open-source hardware, and I think it can keep that root while still pushing 3D printing forward.

    I like the Prusa Mk4, I do, but I think this needs to be the last of this kind of upgrade. Iterative design does great for a while — look at the iPhone as an example — and I don’t have a problem with incremental upgrades, but the MK5, or whatever they decide to call the next machine, needs to be something wholly different and monumentally improved if Prusa wants to stay at the top of the consumer 3D printing market. The Prusa XL, a multi-head tool-changing 3D printer for manufacturing, has a lot of excellent innovations that I would love to see passed down to its smaller sibling.

    Lastly is the price. Eighteen months ago, $1,100 for the new Prusa printer would have felt like a perfectly reasonable sum of money to spend. Now, though, we have printers that are almost as good, if not on par with the Mk4, priced considerably lower. Thankfully, you can get the Mk4 in kit form for $800, which is much more reasonable, and I still think if you’re interested in how 3D printers work, then a kit to build is the best way to get into the hobby. If you’re interested only in the end result, though, there are better options out there.