Apple released the iOS 17.2 release candidate, or RC, on Tuesday, which means the iOS update will likely be released to the general public in the next week or two. The RC includes at least a dozen new features, including long-awaited additions such as the Journal app and Contact Key Verification. Developers and beta testers can download and try the RC and all the new features now.
We recommend downloading the RC on something other than your primary device. Since this isn’t the final version of iOS 17.2, these features might be buggy and battery life may be shortened, and it’s best to keep that experience to a secondary device.
If you’re a developer or public beta tester, here are some of the new features you can find in the iOS 17.2 RC. Note that these might not be the only new features to land on your iPhone when iOS 17.2 is released.
The Journal app
Apple finally debuted the Journal app with iOS 17.2 beta 1. The tech giant announced the app at the company’s WWDC event in June alongside iOS 17, but it was absent from the update’s launch on Sept. 18. It now appears Journal will be included in iOS 17.2.
Apple said at WWDC that the app uses on-device machine learning to create personalized writing suggestions. Some of these suggestions are created using information on your iPhone, like photos you’ve taken and music and podcasts you’ve listened to throughout the day. And if you forget what podcast you listened to earlier in the day — like I regularly do — the app shows you that information when you go to make an entry.
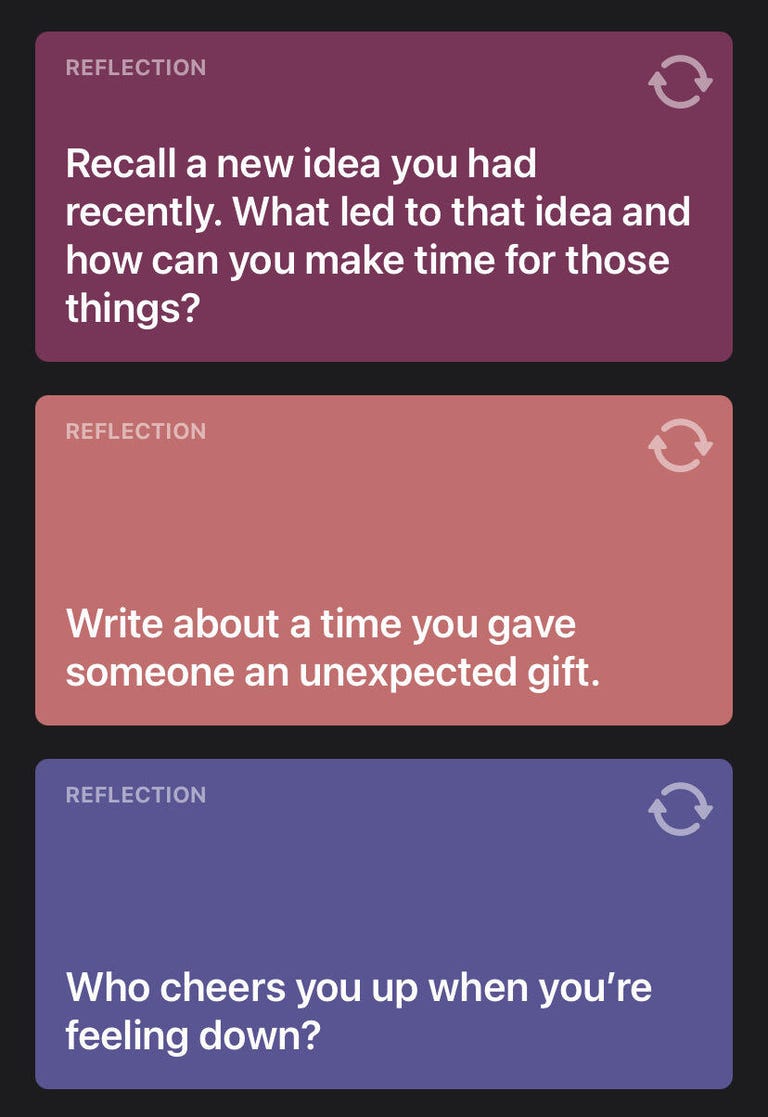
The app also shows you a handful of topics to write about, called Reflections. Some of my Reflections included, “Write about a time you gave someone an unexpected gift,” and, “Who cheers you up when you’re feeling down?”
But if you don’t want to write about whatever you listened to or use a Reflection, you can just write by tapping the New Entry button. In New Entry, you can write whatever you want, or create a voice note, take a photo or create a video to add to your journal entry.
You can also lock the app after it’s closed for a set amount of time for some privacy. So if you close the app and don’t reopen it for a certain amount of time, like five minutes, it will ask for your Face ID or passcode to open it again.
With iOS 17.2 beta 3, Journal asks you to set up a journaling schedule the first time you open the app. You can set the schedule for a certain time every day, every other day or however often you’d like to journal. Once that’s done, Journal will notify you when it’s time to journal. The option to schedule notifications to remind you to journal isn’t new, but this splash screen is.
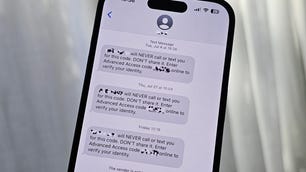
Contact Key Verification in Messages
Apple announced Contact Key Verification in December 2022, and the security feature finally appeared in iOS 17.2 beta 1.
“With iMessage Contact Key Verification, users who face extraordinary digital threats — such as journalists, human rights activists, and members of government — can choose to further verify that they are messaging only with the people they intend,” Apple said in a news release in December.
Apple wrote that many people won’t be the target of a cyberattack, but Contact Key Verification gives people who might be a target an additional security layer.
To enable Contact Key Verification go to Settings > Apple ID >Contact Key Verification, tap the slider next to Verification in iMessage and follow the on-screen prompts.
React with Live Stickers
Live Stickers is a new feature Apple introduced in iOS 17 at launch. The feature lets you create your own stickers from pictures you’ve taken. And in iOS 17.2 beta 1, you can react to texts in Messages with your Live Stickers. To react with a Live Sticker, long-press on a text like you would to add a reaction, then tap Add Sticker in the dropdown menu to pull up your stickers.
New Apple Music settings
If you subscribe to Apple Music — which costs $11 a month — iOS 17.2 beta 3 lets you automatically add songs you’ve favorited to your library. If you don’t like this, you can turn the setting off by going to Settings > Music and tapping the toggle next to Add Favorite Songs.
More Memoji customization
In iOS 17.2 beta 1, there’s a new menu in the Memoji editor called Body that lets you edit the appearance of your Memoji’s body. You can adjust your Memoji’s waist, bust, shoulders and arms in this menu. However, there are only three options in each of these sections as of the time of this writing, so Memoji isn’t a full-on character creator menu as you’d see in a video game.
Change your default notification sounds and haptics
In iOS 17.2 beta 4, Apple allows you to change the default notification sound. This is the first time Apple has allowed iPhone users to change the default notification sound. To change this sound, go to Settings > Sounds & Haptics > Default Alerts, and you’ll be able to select new and classic tones.
In the Default Alerts menu, you can also change your haptics by tapping Haptics near the top of the page. Here you can choose between a handful of haptic patterns, and you can create a custom haptic by tapping Create New Vibration.
Photos and Apple Music working together
If you go into the Photos app after updating to the iOS 17.2 beta 3, Photos will ask permission to access your Apple Music library. The screen says it will use songs from your library to curate songs for your Memories.
AppleCare and Warranty menu
In iOS 17.2 beta 4, if you go to Settings > General you’ll see a new option called AppleCare and Warranty. If you tap into this option, you’ll see all of your devices that are or aren’t covered under AppleCare or a warranty. In previous betas, this option was called Coverage.
Catch-up arrow in Messages
A new feature in iOS 17.2 beta 1 can help you understand what’s happening in a texting group or if someone sends you a lot of messages. The beta brings the catch-up arrow back to Messages, so if you wake from a nap with a lot of messages, you can jump to the beginning of the new messages and follow the drama for context.
The catch-up arrow was in some early iOS 17 betas, but it has been absent since.
New options for sharing Contact Posters
In iOS 17.2 beta 3, you can now share your Contact Poster through Phone and FaceTime. If you go to Settings and either Phone or FaceTime, you will see an option called Share Name and Photo. Tap this and you can select whether to automatically share your Contact Poster with your contacts or whether to require your phone to always ask before sharing. This feature was only in Message before.
iPhone 15 Pro action button updated
According to the Apple news blog iSoftware Updates, iOS 17.2 beta 1 updates the iPhone 15 Pro’s action button. With the beta, the action button now has a translate function. The new function will reportedly allow you to translate phrases or have a conversation with someone in another language.
Sharing content between your iPhone and Apple Vision Pro
Apple announced its Vision Pro headset at WWDC in June. While you can’t buy the Vision Pro yet — Apple plans for the headset to be available in the US in early 2024 — iOS 17.2 beta 1 introduces a setting to allow your iPhone to work as an additional screen for it.
The setting is called AirPlay Receiver and can be found under AirPlay & Handoff in Settings. Apple writes that AirPlay Receiver allows you to stream or share content from your Vision Pro headset to your iPhone.
Spatial Video recording for the iPhone 15 Pro and Pro Max
The second iOS 17.2 beta has a new feature that allows iPhone 15 Pro and Pro Max users to record Spatial Video. This feature will supposedly allow the video to be viewed in 3D on the upcoming Vision Pro headset. Spatial Videos can also be viewed in the Photos app as normal videos.
Disable inline predictions on your keyboard
Have you ever been typing a text in Messages and suddenly a gray word appears in front of your cursor? This is called inline text predictions, and if you’ve ever been confused or annoyed by this feature, iOS 17.2 beta 3 introduces the ability to turn it off. In the beta, you go to Settings > General > Keyboard and tap the slider next to Show Predictions Inline.
More Sensitive Content Warnings
Sensitive Content Warnings were introduced in iOS 17 and blur out images and videos that show up in certain Apple services and that might contain nudity. With iOS 17.2 beta 2, these warnings have been expanded to include contact posters that might include nudity.
More Siri requests
With iOS 17.2 beta 2, you can ask Siri a few new questions, like what your altitude is and what’s your estimated arrival time if you’re using the voice assistant for directions.
Collaborative playlists in Apple Music
With iOS 17.2 beta 1, Apple introduced collaborative playlists for Apple Music subscribers. However, this feature disappeared in iOS 17.2 beta 4. It’s unclear now if collaborative playlists will be included in iOS 17.2 when it’s released to the general public later this year.
Updated Weather widget and app
In previous iOS versions, you’d have three options for a Weather widget: a small tile, a medium size tile bar and a large tile that took up half your screen. All showed the current weather conditions in more detail as they went up in size.
In the first beta of iOS 17.2 though, you have six Weather widgets to choose from. The first three are the original small, medium and large tiles. The three new widgets are all the same size as the small tile, but show more details for the day.
One tile shows the current condition, precipitation, UV index, wind levels and air quality index. Another tile shows the current conditions plus the expected conditions for the next four days. And the final new tile shows when you can expect the sunrise and sunset.
The Weather app also has a few new features, like an interactive moon calendar, the amount of rain for your area over time, and wind speed and direction. The updated Weather app is like having your own meteorologist in your pocket.
New digital Clock widget
In iOS 17.2 beta 1, the Clock widget gets an update as well. The Clock widget now gives you the option for a digital clock to easily read the time.
News app supports Live Activities
The News app also gets an update in iOS 17.2 beta 1. Now, you can enable Live Activities for the app, so you can follow news events, like elections, as they happen on Live Activity-enabled iPhones.
Apple TV app updated
The Apple TV app also gets an update with iOS 17.2 beta 1. If you open the app and tap Store in the bottom menu, you’ll see the Movies and TV Shows sectionsacross the top of your screenare gone.
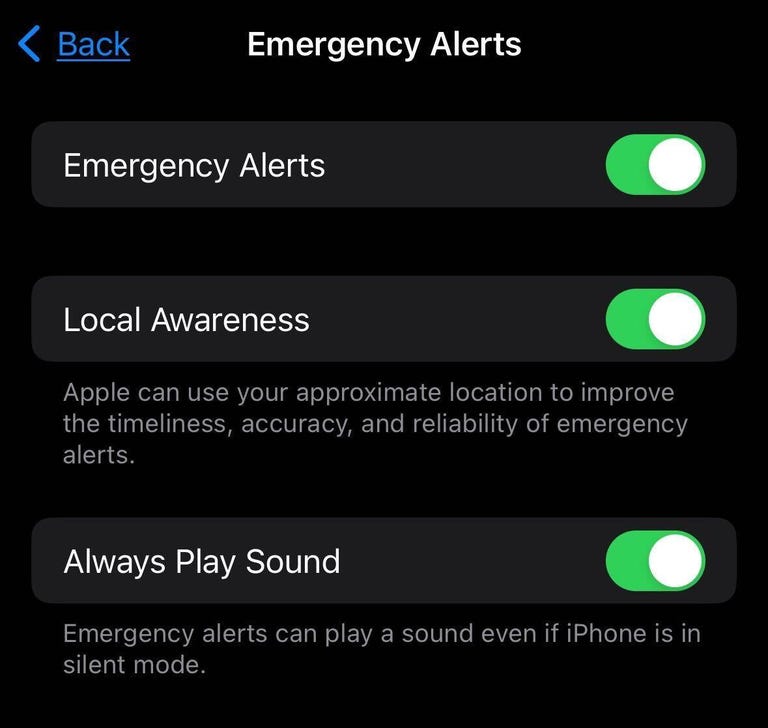
Local Awareness option in Emergency Alerts
With iOS 17.1 beta 1, there’s a new option in the Emergency Alerts menu called Local Awareness. Apple writes that if you enable this option, it uses your approximate location to improve the accuracy, timeliness and reliability of emergency alerts you receive.
More Contact Poster customization options
Contact Posters is another new feature Apple introduced with iOS 17. With iOS 17.2 beta 1, you can customize your Contact Posters even more by giving you the option to give a contact poster rainbow-colored text.
Here are the full release notes for the iOS 17.2 RC:
About This Update
Journal
- Journal is a new app that lets you write about the small moments and big events in your life so you can practice gratitude and improve your wellbeing.
- Journaling suggestions make it easy to remember your experiences by intelligently grouping your outings, photos, workouts, and more into moments you can add to your journal.
- Filters let you quickly find bookmarked entries or show entries with attachments so you can revisit and reflect on key moments in your life.
- Scheduled notifications help you keep a consistent journaling practice by reminding you to write on the days and time you choose.
- Option to lock your journal using Touch ID or Face ID.
- iCloud sync keeps your journal entries safe and encrypted on iCloud.
Action Button
• Translate option for the Action button on iPhone 15 Pro and iPhone 15 Pro Max to quickly translate phrases or have a conversation with someone in another language.
Camera
- Spatial video lets you capture video on iPhone 15 Pro and iPhone 15 Pro Max so you can relive your memories in three dimensions on Apple Vision Pro.
- Improved Telephoto camera focusing speed when capturing small faraway objects on iPhone 15 Pro and iPhone 15 Pro Max.
Messages
- Catch-up arrow lets you easily jump to your first unread message in a conversation by tapping the arrow visible in the top-right corner.
- Add sticker option in the context menu lets you add a sticker directly to a bubble.
- Memoji updates include the ability to adjust the body shape of any Memoji.
- Contact Key Verification provides automatic alerts and Contact Verification Codes to help verify people facing extraordinary digital threats are messaging only with the people they intend.
Weather
- Precipitation amounts help you stay on top of rain and snow conditions for a given day over the next 10 days.
- New widgets let you choose from next-hour precipitation, daily forecast, sunrise and sunset times, and current conditions such as Air Quality, Feels Like and wind speed.
- Wind map snapshot helps you quickly assess wind patterns and access the animated wind map overlay to prepare for forecasted wind conditions for the next 24 hours.
- Interactive moon calendar lets you easily visualize the phase of the moon on any day for the next month.
This update also includes the following improvements and bug fixes:
- Siri support for privately accessing and logging Health app data using your voice.
- AirDrop improvements including expanded contact sharing options and the ability to share boarding passes, movie tickets, and other eligible passes by bringing two iPhones together.
- Favorite Songs Playlist in Apple Music lets you quickly get back to the songs you mark as favorites.
- Use Listening History in Apple Music can be disabled in a Focus so music you listen to does not appear in Recently Played or influence your recommendations.
- A new Digital Clock Widget lets you quickly catch a glimpse of the time on your Home Screen and while in StandBy.
- Enhanced AutoFill identifies fields in PDFs and other forms enabling you to populate them with information such as names and addresses from your contacts.
- New keyboard layouts provide support for 8 Sámi languages.
- Sensitive Content Warning for stickers in Messages prevents you from being unexpectedly shown a sticker containing nudity.
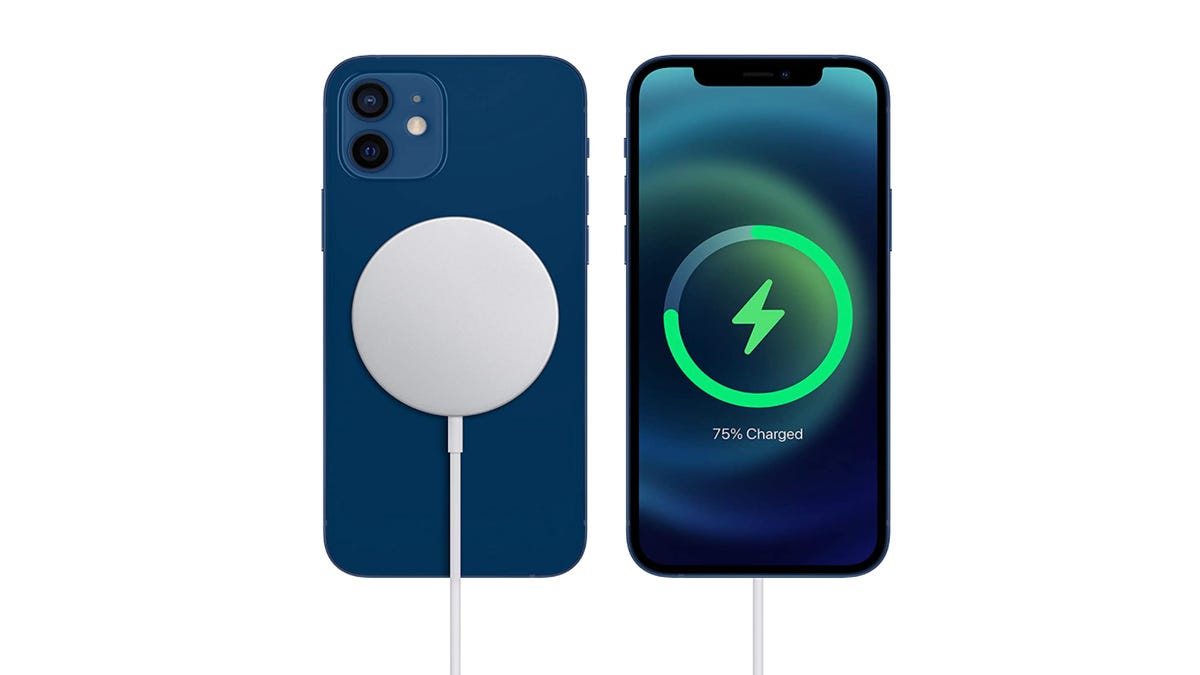
- Qi2 charger support for all iPhone 13 models and iPhone 14 models.
- Fixes an issue that may prevent wireless charging in certain vehicles.
Some features may not be available for all regions or on all Apple devices. For information on the security content of Apple software updates, please visit this website:
https://support.apple.com/kb/HT201222
Since Apple released the iOS 17.2 RC, the company will likely release iOS 17.2 to the general public in the next week or two. However, there’s no confirmed release date at this time.
For more Apple news, here’s what Apple announced at its ‘Scary Fast’ October event, why you should download iOS 17.1.2 now and our iOS 17 cheat sheet.